Friday, 30 July 2010

OK, Shoot Me...

When I first started out seeking information about hand tools and using them, I was astonished with how many blogs and sites there are out there which are dedicated to this topic. There is literally a smorgasbord of information out there for just about every aspect of this hobby.

At first I thought every word on every digital page out there was like the Holy Grail, cast in stone and I could believe every statement. It didn’t take long for my naivety to wear thin and have skepticism take its place.

Lets face it; everyone has their own little hype and their own little sacred cows. If the online hand tool world decided to all write about their favorite smoothing plane tomorrow, it would take a few lifetimes for each of us to do follow-ups on every, “the best that ever was”. I doubt you would find two reports that would agree on the best manufacturer, length, weight, blade angle, tote style, blade hardness, blade thickness, blade edge angle, secondary bevel angle or no secondary bevel at all, adjustment strategy, stroke angle to use, which wax to use to make it slide better and which one to use to make it pretty. Each and every one of us has come up with our own “special” tool, which we all use in our own “special” way. The only thing common to all of us is that we are all very happy and willing to tell everyone else that will listen why our choices and ways are the best, and theirs are wrong.

I still read everything I can find on the subject, but the words, “So you say”, are always present in my mind as I do.

It was this way with shooting boards. I don’t know how long ago it was, but my first encounter with these shop appliances was a few posts Stephen, over on Full Chisel, did on them, discussing what he used them for. This tweaked my interest. Then Rob, over on Woodbloker, wrote a few posts about them discussing how to build one, which turned my interest in them up even more. Finally, browsing through In the Woodshop, I discovered Derek was a firm believer in them. I figured if three guys whose opinions and work I respected where into these things, then there must be something to them.

I studied every pixel in every picture of the three boards that came to be my “standards”. Stephen’s examples are workhorses. Just looking at them (he has a few) tells you it was created to get the job done. Rob has made a few shooting boards over the time I have followed his blog, making them for both friends and for his own use. Like Stephen’s, they are designed for the job at hand, made from “odds n’sods knocking around the ‘shop” and constructed to take a beating. Then I viewed Derek’s entry into the fold. Wow! Made from Jarrah and Tasmanian Oak, it just glowed. Not only beautiful, it included a number of ingenious features for adjustments, as well as a ramped stock platform and Elm adjustment knobs. This set me off on a designing frenzy.

The fact that, to this point, I had never even seen a shooting board in the flesh, let alone used one, didn’t come into the fray. I applied my own form of physics and my own thoughts on design. I considered the flat stock platform, compared to a ramped one and felt the angled one made more sense. With a flat platform, wear on the plane blade is always at the same spot, which would mean having to sharpen it more often. Derek’s example has the stock platform high at the entry end and low at the far end. This, to me, means the plane is pushing the stock up off the base all the time, so I figured reversing that so the blade is always pushing down made more sense. I also thought a ramped base for the stock would make it harder to hold, so I decided mine would have a ramped race for the plane. Like Stephen, I wanted a long one so I could do edge planning, and like Rob, I wanted a “birds house” so I could do flat miters. Because my plan is to build small boxes and such, I also wanted a whole lot more versatility in its use than my three standards offered. I thought my end design had some merit, along with its bird house and ramp, although few others shared my views.

As I still hadn’t used one, I still wasn’t sure about their worth, so building the design wasn’t at the top of my “let’s get er’ done” list. I did get as far as making two attempts to produce a 20” wooden hinge to facilitate some of the adjustments I wanted the board to do; both abysmal failures. As I couldn’t get the pin’s hole straight in either of them, the first completely cracked one flat in my first attempt at opening it and the second wouldn’t open at all. Both examples sit here on my desk and mock me every day, but as they look cool, even though neither works, I refuse to throw them away. Failure to produce a working hinge also turned me off the project a tad.

So last weekend we had a party for my in-law’s sixty-fifth wedding anniversary. It scares me that two people can live with each other for that length of time and come out the other end still talking to each other, but if they can do that, then a celebration in is order. One item I did for them was to make them a rather snazzy poster of the two of them sitting on scattered letters and numerals that spell out “65th anniversary” which we set up on an easel for the all the guests to sign. Not having an easel, my wife borrowed her niece’s, who is a teacher. When it arrived, we discovered it was broken. It was a cheap wooden thing that had a framed tray that held the legs in place, but the tray had just fallen apart over time, so my job was not only to make the poster, but also fix the easel it was to sit on.

I cut the sidepieces for the tray on the same angle as the legs, but not being into the job, I cut them by hand without the assistance of the miter box. I plowed out the slots for the bottom with my Veritas Small Plow Plane, smoothed the faces with my Stanley No.2. and chamfered the edges with my Stanley No.72. When I went to assemble the thing I quickly realized I was going to have to buy Chris Schwarz’s book on hand sawing when he publishes it. What a mess. Unsure as how to fix this, I came upon the brainwave of using my little bench hook as a shooting board and my little Veritas Low-Angle Block Plane to shoot the angles.

My little makeshift set-up absolutely blew me away. I shot all eight angles and was amazed at how clean they came out and how quickly those results were realized. My bench hook is made from a 1/2 inch piece of ply with a 1/8th inch thick piece glued to the end at right angles. Because there wasn't a backing board, per se, I was surprised that there was no tear out or splitting, even on the far end. One additional bonus from this set-up was to show me that my idea of an adjustable miter fence made a hell of a lot of sense, despite the naysayers.


If you have never used a shooting board, get one. It truly is one appliance no shop can be without. If you have one, be thankful for it, and ya, I know, "So say I". On this one, though, you can take those words to the bank.

I may not come up right away with my original design, but starting this weekend, I am going to start building at least a simple example of one because I don’t ever want to cut another board without being able to shoot it afterwards.

Peace,

Mitchell

Saturday, 24 July 2010

Its What Is Not Said That Says It All…

There is one thing you can count on with the experts on the Antique Road Show. If you “messed” with the antique you are showing them, they will be very quick to point that fact out.

The phrase the experts usually use is; “You know the (whatever) is not original?” I am sure those few simple words sound different to the owner of the antique, especially if they are aware that the show has millions of followers whom hang on every word the experts utter. It probably ends up resonating in their ears as, “What the hell did you do to this beautiful antique, you moron?”

I am a huge follower of this show. While I find the British series more entertaining, I find the American version more educational. There is just more variety to American antique furniture, both in materials and techniques. Great stuff, the Antiques Road Show.

This show was mentioned in a recent post on The Full Chisel Blog. It seems that Stephen did some restoration work on a piece native to Salt Lake City that was included in the episode the Antiques Road Show filmed there a few years back. It surprised me even more that Stephen did this restoration work on the piece a full 24 years before I watched that appraisal.

So here’s the point. Stephen did some serious restoration on a piece that was appraised by Leigh Keno on the Antiques Road Show. Leigh is not only one of the more knowledgeable in the show’s bevy of knowledgeable appraisers, but an appraiser who consistently uses the “not original” phrase. The only assumption I can come to for Leigh not mentioning the restoration work is because he didn’t notice it.

In his chosen profession, Leigh Keno is an absolute professional.

As it turns out, so is Stephen Shepherd.

Were there any doubts?

Peace,

Mitchell

Thursday, 1 July 2010

An Interview With A Tool Dealer...

The interview with Jim Bode, the Vintage Tool Dealer, is now finished and posted for your enjoyment.

I decided to post it in its entirety in one post instead of breaking it up into a few. Because of this, it is a rather big file, so I have posted it to my server, then linking to the file from here. Just click on the image below and you should find yourself facing about twenty minutes of entertainment.

Thanks again to Jim for making this thing work. He really put himself out for us and I appreciate it.

Peace,

Mitchell

Wednesday, 16 June 2010

Where's that Studley guy when I need him...


Last week I purchased a great set of English Turnscrews from jimbodetools.com. The minute they came out of the box I started putting together a template of the rack I want to produce so they can hang in splendor in the tool cabinet.
I’ve been a tad remiss regarding this tool cabinet these past few months. The reason for this is that it is not going to work for me. The reality is, I have purchased too many bloody tools!
I think my collection totals over 300 pieces now and it is still growing. Currently, I have two pieces out being worked on by pros, and I have no idea where I’m going to put them when they are finally delivered. Hell, I haven’t even seen them yet, as I purchased them and had the seller send them straight off to the refurbishers. One of them is a beautiful French veneer saw that I purchased, again, from jimbodetools.com. Because I plan to actually use this thing, I had Jim send it to Woodnut4 to sharpen, as well as doing anything else to it that he deems necessary. In honour of Mr. Shepherd over at the Full Chisel blog, I’m now looking for a glue pot.
So you can see my problem.
While Mr. Studley was quite adapt at putting his 300 tools together like a jigsaw puzzle in his, roughly, 4 cubic feet of tool chest, it turns out I’m not so well blessed. I built this case six or seven years ago and have already reconfigured it twice, the current work being the third time I have ripped it all out and started again, trying to make it accommodate the new purchases. Sadly, I don’t live on a farm where I could take over some outbuilding, drive a bunch of nails in its walls and just hang every up around me. Compact storage is a necessity of life.
With all this in mind, I have decided, much to my wife’s chagrin, to chuck it all and start again. To this end I have been mulling things over in my head, trying to get a handle on what would work and what wouldn’t. I think I am now ready to start the plans for a cabinet that will be mainly drawers, a lot wider and deeper than the current version, with a few cupboards with glass doors so I can display some of my pride and joys and be able to look at them as I pass by. I still get a buzz just looking at this stuff.
With my current workload, that new chest is going to be something that is going to take a while, so in the mean time, I am going to do a few additions to the current one, just to get some of these tools up and out of the way. Ok. That is really not the truth. The real reason for wanting to get some of these tools mounted in the cabinet is so my wife won’t really know how this obsession with tools has taken over my life. Included what is already mounted in the cabinet, I have the two huge drawers in the bottom of it crammed full of tools, a bunch sitting on top of it, and a number spread out around the office. I even have three planes sitting beside my main computer station; the No. 3 I turned into an iPhone dock with a No. 2 on one side of it and a No. 4 on the other. Because I have no place for any new tools arriving, I have to leave them out and my wife is starting to catch on. “Is this another new tool?” she asks. “No, dear. It is one I pulled from the drawer just to have it around so I can see it” he answers, lying through his teeth.
So I started this template for the turnscrews and, speaking to a buddy this morning who is into tools, I mentioned it to him. He asked how I was creating it and was surprised when I explained it to him. I thought everyone did it this way.
I use a flatbed scanner.
I mainly work in Adobe Illustrator when I make plans. I have AutoCad and know how to use it, but I just don’t find it as workable as Illustrator when it comes to making templates and things. Illustrator is a vector based graphics program that is the best thing in the world for creating line drawings, as far as I am concerned.
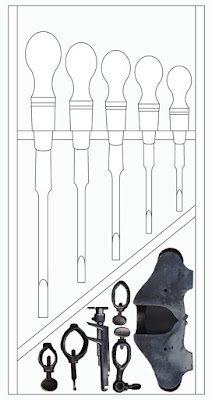
I have a fair sized section in the back of the cabinet that is still empty, so it is a great spot for these turnscrews. The area is 22 ½ inches tall and is more than wide enough to accommodate these screwdrivers. I laid the set of them, all five, down on the flatbed scanner and took a scan of them. This gave me a full-sized image of each. One thing you have to be aware of when doing this is that the scan you make has to be at the same resolution as the drawing you will be creating.
I brought the image into Illustrator and traced them, resulting in a full-sized line drawing. Before I start doing any layout, I take accurate measurements of each piece, making sure it matches measurements of the critical parts of the pieces, which in this case is the collars that will be used to rest the tool on in the rack, as well as heights and widths overall.
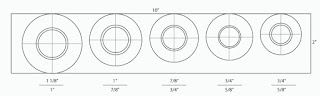
Using these line drawings, spacing them out the same as I want the real versions to be in the finished rack, they allow me to find the centre points for each, resulting in the template that you see below. This is created full-sized, printed, and the resulting paper template is stuck to the stock with double-faced tape. This works out great for drilling the holes and reaming them and makes doing that work very easy and quick as all the sizes are listed for each.

To figure out how the rack will be configured, I use the full versions, this giving me the height and width of the space required, and if I have some space left over, I can do the same for what I want to fill that area with.
I purchased a Stanley 70, a complete set, a year or so ago, and I have been worried I would misplace some of the pieces ever since. The space I had under these screwdrivers would be ideal.
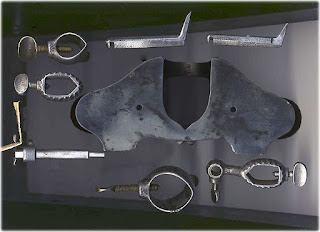
I took all the parts to this plane and laid those out on the scanner. The result is the image you see below; a full sized display of each part’s footprint.

In this case, I just cut out each piece in Photoshop and brought them into Illustrator, leaving them in the original image form so you can see how this works. By moving and rotating the different pieces, you can put it all together like a jigsaw puzzle, taking advantage of every inch you have. You also have to remember the “Z” factor as well; the depth of the area. There are two blades and the depth stop shown in the image below, one on top of the other. This is because they will be mounted in holes drilled into a block of wood on the cabinet base, one in front of the other. With the drawings done, I can lay down the measurements required, print it off, and get to work.
In reality, it is a real buzz doing things this way; using 21st century technology to build something using 19th century tools. Added to that is the fact that what you start out with is as accurate as possible, so mistakes are minimized.
Give it a shot. It works like a dream. If you run into any issues, or want some help getting the templates, give me a shout. I would be happy to help.
Peace,
Mitchell

Sunday, 6 June 2010

Did they really make any of these?


Just a quick question for any of you other "Stanliholics" out there.

Did Stanley really make the 624 eggbeater drill or did they add it to their catalogues as teasers?

I have been all over the world looking for one of these; auction houses, tool dealers, museums, and I haven't seen a real live example of one - not one! The closest I get is the line drawing in the Stanley 1925 catalogue.

If anyone has any ideas or information about this drill, please let me know.

If you have one.....cool. Can I see it?

Peace,

Mitchell

Wednesday, 12 May 2010

Awe, the inconsistencies of it all...


Inconsistencies drive me nuts.

I set out some time ago to purchase an eggbeater drill, searching out what was available at the turn of the century, the last one, not this one, and what I should expect to pay for one.

There seems to be two manufactures that stand out as the drill of choice; Miller Falls and Goodall/Pratt.

Both of these manufacturers produced drills with the supposedly fragile open spoked main gear. I say “supposedly fragile” because of the number of unbroken ones I have seen for sale throughout this quest. Man, there sure are a lot of them. While I’m sure the solid main gear examples are great, there is something about that spoked gear that just does it for me. Great looking stuff, those gears.

Early examples of Miller Falls appear to have a lighter gear casting than their later versions. Goodall/Pratt seem to have stuck with their original light version until both switched to a solid gear in much later examples.

The Miller Falls style of frame is simple, round cornered and reasonably robust. Goodall/Pratt, on the other hand, have a frame casting with a bit more style to it; with its pinched waist and heart-shaped curves. The Miller Falls does appear to be the better made of the two, though.

Both manufacturers produced models with a solid handle, or a hollow storage handle. Miller Falls wins in this category, hands down, especially some of their very early examples that I have come across that have an absolutely beautiful mushroomed shaped cap. Man, those things are gorgeous.

So what’s my beef with inconsistencies?

Since getting into this tool collecting nonsense, the gospel according to the MWTCA gods has been beaten into me…

So I have to ask, what the hell is with this…

Great looking tool. The guy does great work. The point here is; why can an old eggbeater be rebuilt and repainted and as a result, demand a higher price in the marketplace, but a plane or a saw can’t.

It is inconsistent and just doesn’t make any sense to me.

And speaking of not making any sense, I decided I want a Stanley 624. Go figure.

Peace,

Mitchell


Sunday, 18 April 2010

Things Are Sliding, But Hopefully Not Downhill...


I’ll admit to a strange habit. When a project is stalled because I’m not sure how to handle something, I often take a walk around Home Depot and take in the “stuff”. Often, I’ll see something that triggers an idea, and off I go.

I did this yesterday, walking up and down the aisles aimlessly, trying to figure out how to drill that 20” hole in the hinge in a way that would minimize screwing it up. It came to me in the plumbing section, believe it or not, when I spotted the different sized hose clamps.

This is the result of that brainwave.

I guess you would call this a “Sled”, as I think the term “Feed Table” is reserved for a motorized version of this type of thing.

Seeing the hose clamps gave me the concept of how to fix the drill. It wasn’t a stretch of the imagination to come up with the bed, it is just a 1x8 hunk of pine with a couple of 1x2’s used as skates and two more used as guides. A thick coat of LeeValley’s “Waxilit” made the whole thing slide back and forth with minimal force.

I still have to fine-tune the position and height of the drill and make a couple of more clamps to hold and position the hinge. Once I get that done I can take it for a test drive.

The comments from Bill and Steve in response to my last post where I asked for some ideas regarding how to handle this were good, and I appreciated the thought they put into their suggestions. The problem I had was that they both involved cutting up the hinge. Both ideas would work, but both would also take the challenge out of it and frankly, guys, where’s the fun in that?

I’ll let you know how things work out.

Peace,

Mitchell


AN UPDATE!

I produced this jig to minimize screwing up my mahogany hinge while drilling a 1/4" diameter hole through its entire 20" length.

I screwed it up.

Peace.


Friday, 16 April 2010

Shooting Board Update...


Here is where I am at with this wooden hinge for my "be-all and end-all" Shooting Board.

I have the shape roughed out and ready to fine-tune. I am not going to remove any more stock until the pin is holding the two plates together, even though I have to fight to get the barrels lined up right now. For the first time in my life I was really stingy with the material I removed, so instead of having to figure out how to add material to overcome a sloppy fit (something I still haven’t figured out after all these years), this time I have to refrain from removing more to make the joints freer.

The hinge is 20” long and 6” wide, each plate being 3”. The hinge flats are ¾” thick and the barrel is 1 ½” in diameter. I have a ¼” brass threaded rod that will act as the pin, held in by an acorn nut with twin shoulder washers on each end. Drill the ¼” hole, slide the pin in and Bob’s your uncle (he is, actually – God bless him).

I have been putting this little drilling job off now for two weeks.

So what’s the hold up?

That 20”!

I’m scared to death that I will not get the bit aligned right, especially because I will have to drill from both ends and meet in the middle. If that isn’t enough reason to stall the job, I can always add the reality that a ¼” drill bit travelling 10 or 11 inches is definitely going to have some deflection along its way, so even if I get the alignment bang on, how can I be sure the drill won’t decide to head south a quarter of the way through?

Any ideas?

Peace

Mitchell


Monday, 5 April 2010

How to talk about screws politely...


I bought this set of thread cutters recently on eBay, thinking I got a real score as they are a matched set of four and relatively old.
A couple are marked, "Henry Boker", with "Germany" underneath a symbol of an arrow, two crossed lines and a couple of stars. I did some research before I bought them and the only inference that I could find about this manufacturer was on the Davistown Museum web site. There they stated that the Henry Boker company was a prolific exporter of tools from Germany, many landing on the shores of the Americas. Nothing special there, except to me, a matched set of four average tools is much better than four different ones. I said this before in this blog, I think this comes from being raised poor and having a kitchen cupboard of mismatched glasses, cups and the like. The one shinning star in the whole kitchen was my father's matched set of beer glasses. Go figure. Anyway, I grew up with a penchant for all things matching.

Anyway, back to these thread cutters.

I need a number of adjusting and locking screws for my new shooting board so I thought this would be the perfect answer. The listing and the tools are marked; "1 1/8", "1", "3/4" and "1/2", which I assumed was the size of the d0wels used to make the screws. When they arrived, I noticed they are also marked with a second set of numbers, those being; "13", "36", "6" and "2". They make no sense to me.

The other day I stopped off a Lee Valley (just down the street from the college, tee-hee) and picked up some maple dowels, one 1/2" and one 3/4", just to give them a go. Nope, wouldn't fit. All four have sample threads or test pieces, so I measured them to try and figure things out. Just for an example, the one marked 3/4" has a test thread of 11/16", that is a measurement of the none-threaded area above the thread.

If anyone out there can enlighten me on these sizes, I would truly appreciate it.

Peace,

Mitchell

Thursday, 1 April 2010

"He's baaackkkkkk"...WoodTreks...


Of all the digital blogs in all the digital servers in all the world; I had to choose this one.

Ok, that old Bogart movie line didn't quite translate as well as I would have liked it to, but you get the drift. It is my belief that there is one blog out there stands head and shoulders above all the others, and that blog is WoodTreks.
After a hiatus of God knows how long, Cruickshank is back behind the camera making us all better woodworkers again. Having taken time out to move his family to a new part of the country, building a new home, shop, and of course, a new film studio, it has been quite a while since those once anticipated emails started to show up in my in-box again. After viewing the postings on this site more times than I have watched the Law and Order rerun series', I am beyond thankful to see them again.

I would be surprised if you don't already know about WoodTreks, but if you haven't been exposed to the finest woodworking how-to videos on the web today, then you should take it in. Put aside some serious time to do so though, because this is one very serious woodworking blog.

I, like thousands of other amateur woodworkers around the world, like to sit down and yak about what I did, what I bought and what I would like to do when it comes to all things wood. While, in many cases, a lot of information can be gleaned though the thousands of posts that go online every day, the truth is, a lot of woodworking processes are unexplainable in words, even when they are supported by images. Keith Cruickshank, however, has taken a different approach to this information-sharing stuff, and actually kicks it up a serious hundred notches or so, even though talking, ok, writing, isn't his thing. With each post, Keith pretty much says nothing more than; "Hi, I'm Keith Cruickshank and welcome to WoodTreks. In this video series, we visit..."

What Keith does is locate and arrange a film session with some of the best craftsmen in America, all working in different fields. Keith hauls a studio set-up to their location and films them putting on a complete and in-depth demonstration. Where he finds these craftsmen is beyond me, but find them he does, and they are all at the top of their crafts. The results of both of these craftsmen; the one doing the demonstration and the one filming it, are - as appropriately put as I can - just bloody amazing.

One of Keith's latest releases covers Hammer Veneering, as demonstrated by Patrick Edwards, a San Diego based artisan and teacher. In it, Patrick shows you how each step is accomplished, demonstrating each method, shows the wanted result, and explains the pitfalls you can fall into getting there. In this 13 minute video, this pair of masters give you more insight into this process than what could be had in a month's worth of reading.

But it doesn't stop there. In the usual Cruickshank manner, he then follows this movie up with another that discusses only the glue. Hide Glue is a topic very few of us know much about, In this second latest release, the video; "Hide (& Animal Protein) Glues: Background, Selection and How to Prepare", Patrick delves into the many aspects of working with this historic material from explaining and showing all the different varieties, to giving insight into such things as how to determine the holding power of each.
We all have had a home movie camera pointed at us at one time or another and it would not be stretching it to say that the moment we see the lens directed at us, most of us turn into frozen popsicles. Having watched all of WoodTreks' films, each a number of times, I have yet to see one craftsman struggle with their demonstrations. Each and every one of them is relaxed, confident and open. While I have never been privy to one of Keith's film sessions, having worked in this industry many times over my career, I can tell you that this relaxed appearance has little to do with the star, and everything to do with the person behind the camera and the one directing. As Keith wears both of these hats, the credit for relaxing his subjects and letting them do their demonstrations as though they were explaining it to you directly, in their own shop, lies squarely at his feet. It is obvious Keith has nothing but pure talent for relaxing his subjects and allowing them to connect with their unseen audiences.

While Keith has come up with winning content for each movie, the way that content is captured is equally important. Poor lighting, camera angles and a lack of interest all serve to make a very good project go very bad, very quickly. This doesn't happen in Keith's movies as each and every one is far and above some of the best produced and captured productions of this type that I have ever seen. They all are professionally staged, professionally lit, professionally shot and professionally edited, all by a guy with a marketing background who never took a camera lesson in his life. If credit goes to the teacher, than not only do I have to take my hat off to Keith the Videographer, but I have to do so as well to Keith, the Videographer Instructor.

Keith's attention to detail and quality stand out in each production, but if I had a complaint about the site, I would have to say that Keith, the woodworker behind it all, doesn't. There is a person behind every blog out there and coming to know him or her is what adds so much to this insane style of communication. Keith, however, prefers to let his camera do the talking for him. While that camera, in his hands, is very articulate, I would like to see more of what Keith is about.

In the opening titles for each movie you are presented with an absolutely stunning example of quality workmanship; the corner view of what appears to be one hell of a great looking workbench. Some time ago I cornered Keith into admitting that he was the craftsman who created that bench, oversized dovetails and all. When he told me that, I asked that he do a post on it as I would truly like to see it all, not just that one amazing corner. I'm still waiting.

WoodTreks. Far and above better than any old Bogart movie.

Peace,

Mitchell

Sunday, 21 March 2010

Getting the Yucky Stuff Out of the Cracks...


I'm not into gimmicky stuff. I don't sit around watching tv wrapped in an adult sized equivalent of a baby's sleeper, I don't make fancy drinks in a little blender that looks like it came from a sex shop and I don't use a chamois on my car that is purported to be able to absorb half of Lake Erie. Because of my aversion to this kind of junk, I was surprised when I actually made a special trip to-day to pick up some gunk that I have seen advertised on tv lately.

This weekend was spent cleaning the car; claying and waxing the exterior and scrubbing the interior. I really enjoy doing all of this except for one job - getting the crap out of the little joints, cracks and crevices on the dashboard and console. Having had enough of trying to get it out with a rag-wrapped screwdriver, I remembered the ads for this stuff and while I couldn't remember the name of it, I did remember one of the retailers listed in the ad that stocks it. I had my wife run me over to buy some. It took a while to find it as no-one who worked there knew what I was talking about, but we eventually found it.

I didn't even wait to get back home to try it, but instead, while my wife was driving us home, I was stuffing this gunk in every crack and crevice I could reach. The stuff is lime green and looks like that slime stuff the kids went crazy for a few years ago, but it doesn't feel slimy. Actually, to me, it felt like a breast implant, which, if nothing else, proves to you how twisted my mind is. Now whether or not you want to consider its feel as a bonus or not, the main point here is that it actually works.

I forced that stuff into every crack and crevice I could find and watched as it lifted every spec of dust, dirt and dog hair without leaving any residue or stains. It was amazing. So amazing in fact, I brought it in and forced it into the carvings in all our furniture. Same thing; that grey shadow of dust that appears in the nooks and crannies of antique furniture all but disappeared. I got so carried away with this stuff, I even used it on some of my tools to get the elusive sawdust out of some of their corners that I couldn't get out before. Ok, even I will admit that is a bit anal, but like I said, I got carried away.

The stuff is called, "Cyber Clean" and is actually made for cleaning computers and electronics. I used canned air for those, so I doubt if I will ever use it for its intended purpose, but for everything else, it will be the first thing I will reach for. Great stuff.

Peace,

Mitchell


Saturday, 13 March 2010

Possible Answer For Saw Success...


Doing my constitutional this morning, I hit my daily websites to see what they had to say, sell and offer. A posting by Christopher Schwarz on the Woodworking Magazine Blog caught my attention as he was writing about working a handsaw. Having a read, I think I came across an answer for my newly found ability to "cut to the line".

In his article entitled, "My Strategy for Going Deep", the line that really made me sit up and take notice stated, "A low sawing angle is less aggressive, but it is more accurate." Thinking back to my set-up for hand sawing, I realized I had changed it recently, and that change caused a lower angle than what I have used in the past.

Up until recently, I have been clamping the stock to a portable worktable in such a way that allowed me to stand off to the left of it and follow the saw backwards as I made my way along the line. Because of an overabundance of junk in the office lately, finding room for changing my mind, let alone hand sawing a piece of wood has been difficult. As a result, I had to change my set-up and I started to clamp the stock to the right side of the table and stand behind the table to cut along the line. The difference in positioning results in a much lower angle of attack for the saw, I would bet a lower angle of at least 20°. As Chris states, a lower angle means more accuracy, and with the results I have been having lately, I would have to agree.

While the portable worktable that I have been forced to use this past year is one of the better manufactured ones, there is no better terminology to describe it than to simply say that the thing "truly sucks". I am, however, slowly weeding my worldly possessions out of my office, having finally crated my rolling mechanics cabinet this afternoon and booked a shipper to pick it up on Monday. I gave the whole kit and caboodle to my son almost a year ago, but getting about 800 pounds of tools and set of cabinets shipped across the country has not been the easiest, or cheapest thing I have ever done. Finally it is done and the last of it will be out of here come Monday. I also have a set of 4 mag wheels for the car stored here, a purchase I made on eBay over the winter. I have been storing them in my office while I wait for the weather to break and the snow tires to come off. Winter, thank God, is almost over, so they should be out of here in a few weeks. When that happens, the area that has been designated for my small but well built workbench will finally be free after all this time, and I can finally get to work building it. I can't wait. A real workbench again with a pair of saw horses to match. Heaven.

Peace,

Mitchell

Sunday, 28 February 2010

Wooden Mechanicals...


While I have started building my "be-all and end-all" Shooting Board, I haven't fully settled on the design as yet.

Yes, I know. It is a bit arse-backwards, isn't it?

The board needs a secure stay to hold the board at 4˚ angle so I went online this morning to see if I could come up with some help in designing one out of wood. While I wasn't successful with this particular quest, I did come across some interesting postings under the search, "Wooden Mechanisms".

Here are a couple that I found most noteworthy...

http://www.youtube.com/watch?v=R0H0N5qCi3c

http://www.youtube.com/watch?v=fgbUV7xv_sk

The first example blew me away so much I followed the link to the creator's website where things just got more impressive by the click. Here's his site link...

http://www.designedandmade.com/

Peace,

Mitchell

Saturday, 20 February 2010

I Saw The Light...


I started in woodworking when I was about 8, getting involved with my old man’s builds just so I could spend some time with him. By the time I was about 14 he had me trained and capable enough to do every dirty job that ever came up so he wouldn’t have to. If there was a need to anchor a hunk of wood or throw down a chunk of pink fiberglass insulation in a tiny little spot some where way off in the most desolate corner of the attic under the lowest eves in the entire house, I was my old man’s man for the job.

While it is the jobs that had me crawling on my hands and knees through that damned itchy pink crap that I remember the most, the reality is that he also taught me the good stuff too. I might not have been the brightest bulb on the tree, but his teachings about how to get the most out of a tablesaw allowed me to show my 8th grade shop teacher a thing or two about getting almost finished surfaces while dimensioning lumber.

This is not to say he didn’t give me any instruction regarding working with hand tools, because he did. Sadly, that instruction was only preliminary because old pop thought the days for hand tools were seriously numbered. While I can’t believe I’m going to use this term, and God help me for it, but for you younger guys, you have to understand that “back in those days’” power tools were just getting popular as better manufacturing processes and higher volumes started to bring their prices down so the masses could afford them. As a result, what Stanley did for hand tools back in the 10’s and 20’s, companies like Skil did for power tools in the 50’s and 60’s and when it came to them, my old man was at the front of the crowd.

There were a number of times I had to use a handsaw back then, cutting trim and the like, and I used to hate it. If I had a nickel for every cuff I got, followed by a gruff, “Let the damned saw do the work. You just guide it”, I’d be a rich man today. Of course if I had to pay a nickel for every, “I am letting it do the damned work”, answer that I gave, I have to give it all back again.

I hated handsaws. I don’t know what it was about them, maybe a hand/eye thing, but “cutting to the line” wasn’t in my repertoire. I’d have my tongue gnashed between my teeth, my finger pointing where I wanted to go, my driving shoulder directly over the stock, my drive elbow in line with the saw and my arm swinging back and forth in straight line sweeps and I would still watch in horror as that damned, stupid saw would start to track off one way or another on its own. Worse, I’d get through the cut, survive the old man’s cuffs and end up with an edge that looked like it had be whacked out with a hatchet, rather than pop’s prized Disston panel saw. If I was close to the line on the top, I was way off of it on the bottom, or visa versa.

When I was forced to give up the power tools and start working solely with hand tools the first ones I added to my collection were saws, thinking that if I had an array of them, I might stand a better chance creating successful cuts with them. In truth, I found that over the years I hadn’t got any better, and while I thought I had everything under control, “Let the damned saw do the work” was, and is, constantly ringing in my ears every time I pick one up.

To tell you the truth, I always thought that was about as stupid a direction as anything I ever heard before or since. I mean, come on; the saw doesn’t go up and down on its own. If I don’t use the physical force to do it, there is no way that board is going to get cut.

As a result of being saw challenged, I found little tricks to limit the need to use them, or if I had no choice, to allow for my expected mistakes. I replaced my old man’s Stanley 150 miter-box that I had left out in the rain 50 years later and purchased three backsaws of different sizes to use with it as well. The vast majority of cuts I have made since have been with that set-up. Because I never know which way the saw would wander, when I do my layout for cuts that can only be made “free-hand”, I allow anywhere from an eighth to a quarter to the length, knowing there will be some clean-up later. Hell, I have even found myself changing a design just to avoid having to cut a piece free-hand with a handsaw, that’s how bad I am with them.

For some reason, today, a miracle happened, the sawdust parted and I saw the light.

With the help of some of my fellow bloggers’ comments and some more research, I have changed my design for my “be-all and end-all” shooting board. I am sure much to Rob the Blogbloke’s chagrin; I am keeping the construction of it in furniture mode. I have a few shop fixtures in my cabinet that I didn’t make, but ones that are beautifully made in beautiful wood and every time I use them, well – they just make me smile. I am hoping this shooting board will do the same.

The first order of business for this build is to make a rather large wooden hinge, something I have never done before. I’m building just half of it to start, so if I screw up, I’ll only have to throw away a $20 hunk of wood, rather than $40 worth. Starting with a 1 ½” by 4” by 20” hunk of mahogany, I have to turn it into a hinge plate which means a ¾” by 2 ½” strip, the full 20” in length, has to come out of it. I thought about how to do this long and hard over the past two weeks, trying to figure out how I could avoid having to make these cuts with a hand saw, but to no avail. A handsaw it is and a handsaw it must be, and a course rip one at that.

With my heart in my mouth and my breathing nonexistent, I clamped the hunk into the vice and picked up the saw. As I started the cut, every word of my old man’s directions came back; all heard so clearly in his gruff and impatient voice that I almost turned around to see if he was standing behind me again. I started the cut, and as this had to be a blind cut, I worked the cut across the face of the wood, using my knuckles as a guide as I did, getting the saw’s teeth to level out as I went along.

Amazing. Just friggin’ amazing. As I was running that saw down through the wood, I started to hear a little voice in the back of my head saying, “Your letting the saw do the work”. Before long, it was screaming, “You’re doing it! You’re doing it!” Finishing one cut, I flipped the board and started the second, working, surprisingly, in the same manner. I was absolutely amazed at my progress and even said out loud, “So this is what the hell he was talking about. You go saw!”

It took over 50 years, but when the off-cut popped free, I realized that I finally got it. My blind cut was almost perfect, both cuts ending together and even, with no over-cut at all, but most amazingly, the cuts themselves were as smooth and free of rash marks as any of my old man’s cuts that I can remember.

While I’m proud of my accomplishments today with what most would consider a couple of basic cuts, there will still have to be some serious dressing of the resulting facings. You see, because I figured these cuts were going to be the same as all the others I had made in the past, each one was made giving an extra eighth of an inch for saw wander and for the first time in my life, I finally cut to the line.

Peace,

Mitchell

Wednesday, 10 February 2010

Visiting a Past Life...


Going through some old CS’s today, looking for a long lost image file I know I have somewhere, I got side tracked when I came across some shots taken from one of my past lives, to wit, pictures of my old dink from my boating days.

I bought this 11 footer trashed and after some serious swearing while replacing some ribs, laminating the hull, adding a bit more keel to it and, in general, bringing the thing back to life, I thought I ended up with a rather pretty little boat.

Using it as a tender, I fitted it with an 8 h.p. Merc and because of the weight, it would plow through a chop like a tanker; probably with a top speed of about 8 knots mind you, but it certainly was a stable little bugger.

I then came up with the bright idea that I would turn it back into its original configuration as a sailing dink. I laminated and shaped multiple layers of ¼” marine ply for the dagger board and rudder. Once I had the dagger done, I cut what I thought was a huge hole in it towards the bottom and filled it with lead, which probably was the hottest, dirtiest, stinkiest job I have ever performed. In retrospect, I am positive that hole wasn’t nearly large enough.


I think where I truly went wrong with it was when I fitting it out with a sail and mast from a wrecked 16’ Hobie Cat. It might have been a tad too much cloth for the little feller, but after completing the fitting out, just like Captain Jack Aubury, I set sail and went right at 'em.


That first ten-minute run was truly the scariest hour of my life. I have never maneuvered a faster or more unstable boat in my entire life. In a very light breeze that thing shot from one side of the marina to the other and all over the place in between. My main concern above all else the entire time was out there was just trying to keep me arse in the cockpit.

When I finally got back to the dock, one of my neighbours asked, rather sternly I might add, “Just exactly what do you think you were doing out there?”

My answer, “I’m not sure, but I think probably about 30 knots!”

The pictures of it under sail are ones where I am not at the helm. The captain is a much braver sailor than I. These shots were actually taken on its second sail, two days before the new owner took delivery of it. You bet I sold that thing as fast as I could find a buyer for it, but the silver lining in it all is that I made a bloody fortune on that little boat.

Peace,

Mitchell