
Last week I purchased a great set of English Turnscrews from jimbodetools.com. The minute they came out of the box I started putting together a template of the rack I want to produce so they can hang in splendor in the tool cabinet.
I’ve been a tad remiss regarding this tool cabinet these past few months. The reason for this is that it is not going to work for me. The reality is, I have purchased too many bloody tools!
I think my collection totals over 300 pieces now and it is still growing. Currently, I have two pieces out being worked on by pros, and I have no idea where I’m going to put them when they are finally delivered. Hell, I haven’t even seen them yet, as I purchased them and had the seller send them straight off to the refurbishers. One of them is a beautiful French veneer saw that I purchased, again, from jimbodetools.com. Because I plan to actually use this thing, I had Jim send it to Woodnut4 to sharpen, as well as doing anything else to it that he deems necessary. In honour of Mr. Shepherd over at the Full Chisel blog, I’m now looking for a glue pot.
So you can see my problem.
While Mr. Studley was quite adapt at putting his 300 tools together like a jigsaw puzzle in his, roughly, 4 cubic feet of tool chest, it turns out I’m not so well blessed. I built this case six or seven years ago and have already reconfigured it twice, the current work being the third time I have ripped it all out and started again, trying to make it accommodate the new purchases. Sadly, I don’t live on a farm where I could take over some outbuilding, drive a bunch of nails in its walls and just hang every up around me. Compact storage is a necessity of life.
With all this in mind, I have decided, much to my wife’s chagrin, to chuck it all and start again. To this end I have been mulling things over in my head, trying to get a handle on what would work and what wouldn’t. I think I am now ready to start the plans for a cabinet that will be mainly drawers, a lot wider and deeper than the current version, with a few cupboards with glass doors so I can display some of my pride and joys and be able to look at them as I pass by. I still get a buzz just looking at this stuff.
With my current workload, that new chest is going to be something that is going to take a while, so in the mean time, I am going to do a few additions to the current one, just to get some of these tools up and out of the way. Ok. That is really not the truth. The real reason for wanting to get some of these tools mounted in the cabinet is so my wife won’t really know how this obsession with tools has taken over my life. Included what is already mounted in the cabinet, I have the two huge drawers in the bottom of it crammed full of tools, a bunch sitting on top of it, and a number spread out around the office. I even have three planes sitting beside my main computer station; the No. 3 I turned into an iPhone dock with a No. 2 on one side of it and a No. 4 on the other. Because I have no place for any new tools arriving, I have to leave them out and my wife is starting to catch on. “Is this another new tool?” she asks. “No, dear. It is one I pulled from the drawer just to have it around so I can see it” he answers, lying through his teeth.
So I started this template for the turnscrews and, speaking to a buddy this morning who is into tools, I mentioned it to him. He asked how I was creating it and was surprised when I explained it to him. I thought everyone did it this way.
I use a flatbed scanner.
I mainly work in Adobe Illustrator when I make plans. I have AutoCad and know how to use it, but I just don’t find it as workable as Illustrator when it comes to making templates and things. Illustrator is a vector based graphics program that is the best thing in the world for creating line drawings, as far as I am concerned.
I have a fair sized section in the back of the cabinet that is still empty, so it is a great spot for these turnscrews. The area is 22 ½ inches tall and is more than wide enough to accommodate these screwdrivers. I laid the set of them, all five, down on the flatbed scanner and took a scan of them. This gave me a full-sized image of each. One thing you have to be aware of when doing this is that the scan you make has to be at the same resolution as the drawing you will be creating.
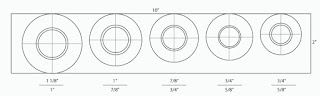
I brought the image into Illustrator and traced them, resulting in a full-sized line drawing. Before I start doing any layout, I take accurate measurements of each piece, making sure it matches measurements of the critical parts of the pieces, which in this case is the collars that will be used to rest the tool on in the rack, as well as heights and widths overall.
Using these line drawings, spacing them out the same as I want the real versions to be in the finished rack, they allow me to find the centre points for each, resulting in the template that you see below. This is created full-sized, printed, and the resulting paper template is stuck to the stock with double-faced tape. This works out great for drilling the holes and reaming them and makes doing that work very easy and quick as all the sizes are listed for each.
To figure out how the rack will be configured, I use the full versions, this giving me the height and width of the space required, and if I have some space left over, I can do the same for what I want to fill that area with.
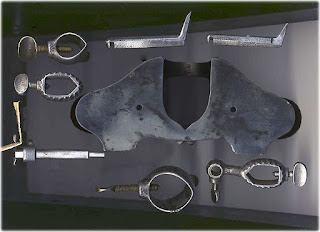
I purchased a Stanley 70, a complete set, a year or so ago, and I have been worried I would misplace some of the pieces ever since. The space I had under these screwdrivers would be ideal.
I took all the parts to this plane and laid those out on the scanner. The result is the image you see below; a full sized display of each part’s footprint.
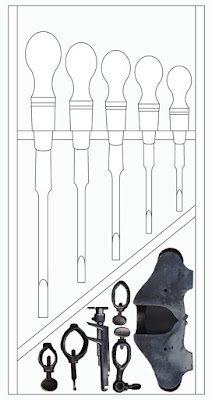
In this case, I just cut out each piece in Photoshop and brought them into Illustrator, leaving them in the original image form so you can see how this works. By moving and rotating the different pieces, you can put it all together like a jigsaw puzzle, taking advantage of every inch you have. You also have to remember the “Z” factor as well; the depth of the area. There are two blades and the depth stop shown in the image below, one on top of the other. This is because they will be mounted in holes drilled into a block of wood on the cabinet base, one in front of the other. With the drawings done, I can lay down the measurements required, print it off, and get to work.
In reality, it is a real buzz doing things this way; using 21st century technology to build something using 19th century tools. Added to that is the fact that what you start out with is as accurate as possible, so mistakes are minimized.
Give it a shot. It works like a dream. If you run into any issues, or want some help getting the templates, give me a shout. I would be happy to help.
Peace,
Mitchell
