Monday, 29 August 2016

And Who, Exactly, Is Going To Clean Up That Mess...

So this is where I stand with this saw handle this morning...


What a blast doing this project. I love it!


I never really thought one rasp could be much better than another, given the job they were designed to do. All you want it to do is remove material, how complicated is that? Well I guess it is more complicated than I realized because I have never seen a rasp remove as much material as quickly as this Auriou does, and it isn’t even the coarsest grain. If you aren’t up on them, here is a link to Lee Valley’s listing...Auriou Rasps.

I already had a drawer full of rasps before buying this Auriou, but I was never happy with them. They range in age and manufacturer, some originally purchased by my old man, years and years ago. The ones I had purchased were spread over the price spectrum, a result of searching out a decent product. None, neither the ones my dad owned, or the ones I purchased were worth a Tinker’s-dam, in my opinion.

Over the past couple of years I have signed on for some online cabinet maker’s courses, a notable one being the courses offered by Paul Sellers at https://woodworkingmasterclasses.com. That was a fabulous source of information and direction. While he doesn’t have the same type of instructional set-up on the web as Paul does, Christopher Tribe at http://www.christribe.co.uk/ has also been helpful, especially through his instructional videos on YouTube. Both of these gentlemen highly praised the Auriou rasps so I thought I would give one a go. It just took me a couple of years for the need to arise, along with the bullet needed for biting when I finally ordered it. 

I will be ordering a couple more at the end of next month. Hopefully, they won’t increase in price before then.


I went at the handle with the rasp and 80 grit sandpaper because I was anxious to see how the design would look and feel. I love the look and the fit is great, the extra ½” I added to the length of the grip being a huge help to the handle’s comfort. The long horns are friggin’ amazing looking as well. I had to force myself to stop because the next step is where the rubber meets the road, and if they don’t connect, it firewood. I’m talking about drilling out for the screw studs...scares the bejeebers out of me.

Peace,

Mitchell


Sunday, 28 August 2016

And He’s Off And Running...

I got started on the dovetail saw handle, going through the usual steps for creating such things.

I printed off a copy of the “final, final” handle outline, the exact same image that was in my last post, then flipped the image and printed a mirror outline. I glued one of those print-offs to a hunk of Bastogne, a highly figured species of Walnut, this particular piece having some beautiful rays crossing its strong grain.

Using Forstner bits of appropriate sizes, I start to remove the waste and create the different curves in the design...


I used the holes to align the ‘flipped’ image on the opposite side and then I went at it with a scroll saw (electric because I’m getting lazy in my old age). I left some material around the outside of the cut line so if the saw cut was out of square, a notorious reality with these types of saws, I would have enough extra material to file it square without removing any from inside the cut line.


In this image, I have laid the old handle on top of the new to show how much larger the new handle is, the difference in their hang angles, and the overall shape of the two...


This last image shows the pair of saws, one with its old handle and one with its new...


At this point the work was stalled until my new Auriou rasp showed up in the mail from Lee Valley. When I went online to order it, I discovered a scary reality. The price had increased about 40% since the spring of this year, so I won’t wait long before I order more...

That’s it until next time,

Peace,

Mitchell


Monday, 22 August 2016

The Final, Final Handle Design for my Jackson Dovetail Saws...


Yesterday I posted the “Final” saw handle design and today I’m posting the “Final, Final” design. 

This change is brought to you by Kenny Melnzinger, a very kind gentleman who happens to sell his “tuned” handsaws at the Tools of the Trades Show and Sale in Pickering, Ontario. He will be there again at the 2016 Fall show on October 2nd. Check the show ad to the right of this article.

So Kenny says to me, “Go read the article on Hang Angles on the Blackburn Tools website and get back to me.” 

I went. I read. I changed the damn drawing.

In truth, the Blackburn article discusses exactly the problem I was talking about regarding my combined elevated work bench and my butt being built too close to the floor. The whole idea of the Hang Angle is to keep your wrist from cocking up or down during the cut. I chickened out, though. I had tried a few different things with the set-ups I have and I felt the hang angle of these saws had to be brought down a fair bit, but with everyone saying, “Be careful”, especially Kenny, I decided that instead of reducing the hang angle on these saws by 8°, I’ll play it safe and drop them by only 2° instead. Hey, I never told any of you I was gutsy.

So here is the final, final version (it has to be - I’ve printed it off, stuck it to the wood and I have already started drilling)...


If you compare it with the one shown in the previous post, you can see things are about the same, size-wise, but the hang angle on this version is more pronounced and the horns a little longer. I like horns, what can I say?

I’ll post photos of the progress.

Peace,

Mitchell


Sunday, 21 August 2016

Final Handle Design - Unless Told Otherwise...

You guys were a lot of help with this saw handle exercise. The consensus of opinion was that there needed to be more meat on the bone so I beefed up the parts that needed beefing. As a few of you said, I can always scrap away if needed, but I can’t add to it.

The one thing that wasn’t discussed by anyone was the “Hang Angle”, the angle of the grip relevant to the saw plate. These plates are roughly 3½” deep at both the toe and heel, so they aren’t really textbook dovetail saws. The original handles have a hang angle of 38°, which I found a little awkward when cutting dovetails on a hunk of wood held in my portable vise as it raises the work level by 6” or so above bench level. I think that dropping the angle to 30° will make the saws more comfortable to work with at the higher position. If any of you disagree with that, please let me know.

So here is the “beefier” final design - maybe...


Peace,

Mitchell

Friday, 19 August 2016

I’ve Got To Get A Handle On These Saws...


Back in 2007 I purchased a nice, little 12” Jackson dovetail saw from Daryl Weir. He had straightened it, sharpened it, made it look pretty, or as pretty as a Jackson dovetail saw made by Disston in about 1888 could be, and posted it on eBay to sell. It was a nice, little dovetail saw that was filed as a rip. The saw plate was a tad thick, but I was happy with it, so off I went to find it a mate, one that could be filed cross. Fast foreword two years and I found an identical Jackson, a little rough around the edges, but repairable. I had the seller send it to Daryl, who did his magic on it so by the time it got into my hands, it was as good a saw as its partner. I was such a proud papa.


I had the pair for about six months when my father-in-law, who was living with us at the time, came into my office/workshop for a visit and to see what I was doing. I was cutting dovetails for the plant shelving unit I was building my wife at the time and the pair of saws were sitting out on what I was using at the time as a bench. I don’t know what he did, but I heard a crash and turned around to see the two saws on the floor with both handles broken in half. It was an accident and I was just relieved he hadn't hurt himself. I glued the pieces together so the saws would be usable and started a new search for two whole handles. I’m still looking for those replacements.

I finally made up my mind that I had to do something with these two saws to make them whole again, so I decided to make new handles for them in two different woods. I decided one would be in apple but what to use for the other is still up in the air. It took a while to find some that was suitable, but I finally did on a Facebook group page set up for nothing else but to sell wood. I purchased a piece 4’ long, 8” wide and 1¼” thick from a gentleman in the States who ended up sending me 6’ of it for the price of 4’. I also purchased a new 9”, Grain-10 Auriou Cabinetmaker’s rasp so now I am all set to rock...almost.

I’m still fussing over the design. I ended up producing about 8 different possibilities, some normal looking and some not so much. I have now weeded it down to these two possibles...

This is the original Jackson handle
This design has some mildly extended horns

This design has some seriously exaggerated horns

So does anyone out there have an opinion on these? or advice on where to take it?

Cheers

Mitchell


Friday, 25 March 2016

Let It Rip...

Probably the last person in the world who should buy a table saw is me, given my lack of eyesight, but I did...
My new table saw - a Ridgid 10-inch Portable Table Saw
Model R4513
I need to do some resawing to make some book-matched panels and I couldn't find a bandsaw with enough oomph to do it in the size or price range I was hoping for, so I settled for this.

It is a Ridgid 10-Inch Portable Table Saw, Model R4513, which I bought from Home Depot for $425 plus applicable taxes. American readers will note that is a lot more than what they would pay for this same saw. Welcome to our world, here in Canada. The regular price on this saw is $499, but one of the tool guys that I'm friendly with offered to drop the price to close the deal. I didn't argue.

This Ridgid is the heaviest of the "Portable" saws, coming in at around 100 pounds, but I don't know how, given the amount of plastic in it. While I was putting it together I was pretty unimpressed with its lack of metal bracing underneath...

The plastic base is severely lacking metal.
It has a single centre control cluster on the front of the saw for blade height and angle, which struck me as a tad odd. It is no big deal, but I'd prefer to see the usual angle crank on the side...

The oversized On/Off switch is on the left of the saw's face. You
adjust the blade's angle by releasing the cam-lock located above
the centre control cluster, then set the angle by turning the outer
ring of the cluster. You use the spinner handle to adjust the
blade height and the centre knob to lock it in place.
The machine stores all its parts quite intelligently, if your in to that sort of thing. I'm not, because if you change accessories for some reason, or buy more of them, the fancy storage solutions suddenly no longer work...

There is built-in storage on the left end of the saw; places to
hold an extra two blades, the wrenches for swapping the
blades, and a mount for the Anti-Kickback Pawls and
the Blade Guard.
The right side has storage for the Mitre Gauge (even with an
extension board added), the Rip Fence (without a sacrificial
fence attached) and one Push Stick. There will be no place for
the second Push Stick, the two Push Blocks and the two
Feather Boards I plan to add next week. As far as I'm
concerned, Ridgid should have just added a couple of
Cup-Holders to the thing and be done with it. (kidding)
The fence is probably the best I have seen on any in the "Portable" saw crowd, and works well with the 29" x 29" aluminum table top...

The fence actually locks and doesn't move even when smacked
with a hunk of wood. A nice surprise for this type of saw.
The incorporated stand doesn't seem to rack too much, it seems heavy enough to hold the saw, it folds up easily and it makes moving and storing the saw a whole lot easier than a fixed stand...

Cool, no?
I'll make a couple of "cross-cut sleds", one small and one large, to handle the different sized stock I'll be cutting. I am hoping the stock fence will do, but I won't hesitate to swap it out for a good after-market unit if it proves to be poor. For resawing, I can mount a wider and longer board to the fence to help the stock stand parallel to the blade. 

As a so-called "Galoot", I feel guilty buying this thing, but I'm just getting too old and way too damned lazy to do a lot of hand sawing these days.

Peace,

Mitchell


Sunday, 21 February 2016

My Only Fear...


Wednesday, 2 December 2015

Addition to "What'ca Doin' With That Tree"...


I meant to add this to my previous post (see below) but my wife called me to dinner and I forgot about it.

In the late 80's, a friend of mine bought a large wooded lot at the south end of Ontario's cottage country so he could build his family a new home. The plan was, they would continue living in their existing home while he built the new one during his off-seasons. He is a boat builder and restorer, and a damned good one, so his off-season time became less and less each year, resulting in the house taking a far longer time to build than he had originally planned.

The first order of business was to fell a number of trees to clear an area large enough to build on and as the majority of the trees were poplars, he did so with the thought of harvesting lumber from them in mind. He used their heavy branches as spacers to stack the logs to dry. They sat that way for almost 4 years. 

When the house was getting close to being inhabitable, he hired an acquaintance that owned a portable mill and they spent almost a week turning all the logs into workable lumber. Not knowing when he would get around to milling the lumber into trim, he stacked the boards with sticking so they would dry further. Sometime over the following year he ordered custom knives with trim profiles to fit his planer and ran some test pieces. At this point, the lumber had been drying for about five years and, according to him, had a 16% moisture content.


Shortly after he ran the test trim, the county building inspector arrived to inspect some recently completed work. Somehow the conversation during that inspection turned to the trim material and my buddy explained what he was doing and showed the inspector the test samples. The inspector immediately told him that he couldn't use the lumber.


According to the National Building Code of Canada, all lumber used in construction must be graded and approved by Canadian Lumber Standards Accreditation Board. This includes all structural lumber and remanufactured lumber; remanufactured lumber meaning all non-structural lumber that is not in its original standard size, i.e.: trim. Anyone can call one of the many approved Lumber Grading Agencies and have them come out and inspect your self-harvested lumber, stamping it with the appropriate stamp if it passes and making it instantly usable. This is done, however, on your own dime and it ain't cheap. If I remember correctly, they quoted my buddy $5k to inspect his lumber pile.

As he had a bunch of money tied up in his pile of unusable lumber, he refrained from putting a match to the lot of it and he has been slowly using it up on the different projects he as done over the years.

Now you know why most of the trees that you see being cut down in your neighbourhood are turned into firewood.

Peace,

Mitchell


Sunday, 29 November 2015

What'ca Doin' With That Tree, Mister...

A neighbour of mine was having a couple of trees cut down in her backyard and I asked her, without thinking, for a 3' hunk of the trunks from each.

The arborists came, started cutting, then called me over to choose the trunk runs I wanted, like I knew where the best wood would be. With their help, ok, with their decision, I left and they completed felling the trees. The next day I looked over the fence and there were two 3' long hunks of trunk; one from a dead ash tree and the other from an almost dead elm.

Problem Number One: How to get these suckers home.

I went to http://www.woodweb.com/cgi-bin/calculators/calc.pl?calculator=log_weight, and using their Log Weight Calculator, I determined that the 20" in diameter ash log weighed 407 pounds (184.6kg), and the 19" in diameter elm log weighed 297 pounds (134.7kg). Picking them up and carrying them home wasn't going to happen.

First, I tried to put the elm log on one of those convertible carts; the ones that can be converted from a two wheeled cart to a 4 wheeled one and back again, but it got bent up pretty quick. My neighbour came to my rescue again and offered to borrow her cousin's fridge-cart for me to use. I was back at it the next day and using the borrowed fridge-cart, I got both logs home without much difficulty.

Problem Number Two: How to cut the things up into planks.

I searched the web for locals who commercially milled logs using portable mills. The two quotes I got were $800 and $1200, both understandable (I guess), and both ridiculous, given the amount of lumber I was going to get out of them.

Next, it was pricing out a chainsaw and milling attachment. To make the purchase worth while, I was going to have to buy a chainsaw that I could use to harvest more lumber from felled trees in the neighbourhood. That meant a 28" or 30" chain and bar was needed, so I first searched for a used machine, which I couldn't find, then priced out new stuff. The milling attachment was cheap at $79, but the chainsaw, not so much. A 28" saw was around $1200 and a 30" around $1300. It then dawned on me that doing this again with other felled trees wasn't going to work...see "Problem Number One".

I then said the hell with it and went off to rent one. For some reason, chainsaws aren't widely stocked by rental companies. It took me two weeks of "dropping by" the local Home Depots to see if they had one available, all because they do not reserve tools for rent. Finally, I got one, the longest I was able to get; a 20-incher.

I started with the elm log and quickly realized that, despite what my wife has told me in the past, size really does matter. The saw was neither long enough or powerful enough to cut through the 19" in one swipe.

I thought about it for a while and decided to just go for it. I realized that, without some sort of guide, making multiple cuts that were aligned with each other wasn't going to happen, so I went from wanting to cut 1¾" to 2" slabs to cutting them 3" to 4" thick. I ran the saw down one side, cutting half way through, then ran it again down the opposite side while trying desperately to align it with the first cut. I can dream, can't I?


Once I got the second cut done, I wasn't surprised to discover that I had to do a third, adjustment cut, one that tied the two cuts together. It was a real struggle, but I finally got the elm log cut up into about 6 slabs in widths close to what I wanted, 4 of which were usable.


I attacked the ash log and quickly realized why it weighed so much more than the elm. Man, was it hard stuff. It took forever to get through it, but eventually, I ended up with another 4 usable slabs.


I cut a bunch of construction grade 2"x2" to length and used them as sticks to stack the slabs, then covered the pile with slabs that I figure I won't be using.


All the slabs range from 3" to 4" in thickness, but by the time I plane them straight and flat, they will be around 1½". I am sure there is an electric planer in my future. 

I do not know what I'm going to use the elm for, but I will be using the ash to make my butcher block workbench top a little wider. Because the ash was dead, I think it will be dry enough to use next fall,  but the elm will probably take a few years to dry out properly.

Would I do this again...never. 

It is way too much work for the amount of wood I got out of them and way too expensive to increase that yield. I have read about a woodworking club in the states that owns a WoodMiser that they use to mill fallen and felled trees, but the woodworking clubs in my area are not involved with this and have no plans to start. The biggest issue, though, is "Problem One", hauling the uncut logs around. For that, I would have to buy a truck, and my wife ain't the truckin' type of gal.

Peace,

Mitchell


Sunday, 25 October 2015

I Cut A Dovetail In A Blazing 40 Minutes...

A few years ago I put together a front walk using 4" x 8" paving bricks. The following year, I added a planter bed in a corner of it that was begging for some life. Not surprising, the year after that, the paving bricks fell into the bed. Go figure.

What was needed was a solid retainer to hold back the bricks, which, of course, meant pulling up all the previously laid brick. Again, go figure.

This was a relatively small plant bed, being only 2' wide and 5' long. The problem I faced was; how could I make a 4" x 4" frame that size, that the forces of nature, or paving bricks, couldn't shift over time. The answer was to put a frame together using mechanical joints; i.e.: Dovetails.

Now I have trouble creating tight dovetails in ¾" stock, let alone 3½" stuff, but in for a penny, in for a pound, off I went to make a dovetailed plant border. As I started laying out the tails, every video I ever watched on how to cut dovetails started to replay in my mind. Of course, the most prominent were the ones the dovetail pros posted a few years ago showing how to cut dovetails in a few, short minutes. Somehow I didn't think they were going to help me much with this job.

I did the layout, then, using a 14" tenon saw, I cut the tails. With the four tails done, I used them to mark the pins and, again, used the tenon saw, I cut their shoulders...


Using a ¾" chisel, I started to chop down from one side, leaving a considerable amount of wood on the outside end to support the cuts I was going to have to do from the opposite side...


Once down an inch or so, I flipped the timber and started removing wood from the opposite side, chopping away the waste...


Surprising as it was, they didn't turn out too bad. They took a bit of persuading, but all four went together very well, all being tighter than most of the dovetails I have cut in the past...


The end result was a frame that will be more difficult to shift once it is filled with soil and has the grass pressing up against its outer surface...


Now I can let the damned decorative grasses I planted here fill the bed between the timbers as much as they want and I won't have to cut them back every year. Bonus!

In reality, it isn't like I haven't had considerable practise making dovetails lately...


I have thirteen of these suckers made so far, with the stock for the remaining eight sized to length, width and thickness, with just the joinery remaining.

They are all made from solid ½" oak, each corner dovetailed with the ½" oak bottom sliding home in a ¼" dado (North America), housing (UK) or trench (Europe), that was cut ¼" from the bottom on all four sides. I used solid oak, mainly because I had so much of it, but also because I thought it may be advantageous when it comes time to add mounts, supports or dividers to each drawer to hold the tools in place. I can remove the sliding bottoms at any time in the future to modify the drawers' interiors, and if I have to cut into the bottom or sides for any reason when I do these mods, the solid wood will be better to work with than plywood. That's my story anyway, and I'm stickin' to it.

On another note...

Help!

The top portion of this bench/cabinet will have two 20" wide hinged tool tills attached to a 40" base till. The sides of each will be maple while the faces will be walnut, assembled in the typical campaign furniture style; the sides, top and bottom dovetailed together as a frame and the face pieces will float in a dado cut around the outside edges of the frame. The end result will be similar (but not the same) to the illustration below (one of 37 designs I came up with)...


So what advice do I need? It is in regards to the two walnut panels that enclose the face of the two hinged tills, as well as the back of the stationary one. The question is, do I make them out of solid stock or veneer a more stable material? The questions I have are...

How much expansion do you think there will be with a 40" wide glue-up of solid walnut?

Would you build it from solid stock or veneer a substrate?

What would you use for a substrate if you went the veneer route?

Any advice you guys can give me will be greatly appreciated.

Peace,

Mitchell

Wednesday, 26 August 2015

A Place To Hang My Hat In The Garden...

It has been a long, hot, wet summer here, but I shan't complain. Throughout it, I have continued making the 21 drawers required for my rebuild of the tool cabinet, but I have to admit that there are a number of them that still look like board stock. I know there are drawers in them...somewhere.

That said, I haven't exactly been sitting on my laurels...


I spent at least six weeks adding a garden shed to the backyard and extending the existing patio. I basically built the thing like it was a full sized house, even though its footprint is only 5-foot by 7-foot. This is actually bigger than I originally wanted. Our backyard is small, so putting a structure of any size in it will overpower everything else, hence the chosen size. It is 2x4 construction, sitting on a 2x6 platform, sitting on 6x8 railroad ties, sitting on 4" of ¾" stone. Everything, except the railroad ties, are built with pressure treated wood.


I have a neighbour who deals in replacement doors and windows and he gave me the steel-clad door and window for free. The widow is actually a basement unit, but works well vertically. The door, with the rose-themed frosted window, works, although at 6' 8", it is a bit taller than I initially wanted, forcing me to build the shed larger than the 4-foot by 6-foot footprint I originally planned. I increased the size because I thought it might look like a telephone booth if I didn't. This is great stuff that was headed to the landfill, and I couldn't argue with the price. 

The skin is ³⁄₈" SmartPanel, made by LP Building Products. It is epoxy impregnated chipboard that has a pressed grain design on its outer surface which is coated with an epoxy "primer". It is great stuff, but I was very leery of leaving its edges open to the elements for fear they would swell. To cover them, I went to a board-and-batten design, covering the butt joints with a piece of 1x2 construction grade fir or spruce, fully caulking them to the shed's surface. I ripped a ¾" rabbet in some so they would fit over the bottom edges of the SmartPanels, which were mounted ¾" up from the bottom edge of the platform, and they each got a heavy dose of caulking before they went on.


I made trusses for the roof out of 2x4s and used the cutoffs of the ¾" pressure treated plywood, leftovers from the floor, as gussets. 


To give the eves some breathing space, I set the trusses that would normally be flush with the wall studs back 6". This gave me a 2½" airspace around the circumference of the building. Instead of installing regular soffits, I made ¾" by ¾" frames and covered their upper-side with two layers of fiberglass screening material. I used two layers so you can't see the bottom surface of the roof skin. All of this will allow the building to breath and I won't have to worry about finding a hornets nest inside one day.


I added a fair amount of personal touches to this thing, including a carved Gable Drop. I purchased the ornamental ball finial at Lee Valley; a 2⁷⁄₁₆" hardwood turning that Lee Valley sells for a mere $3.80, probably the cheapest thing I have ever bought from them.


I wanted an additional door that is as wide as possible on the side, but I didn't really want them to show, and while the structure isn't quite finished yet - I still have to add a drip-rail across the top of these, as well as some battens to make the side wall match the front, - I think I came up with a good way to disguise them. The shed floor is almost a foot above the ground, which means I needed a ramp, so I built one - but I made it in the shape of a seat. Because this seat is in the shade, we have used it often to sit out and relax, but...


...when I have to bring the lawnmower out, I release the two clips that hold the supporting chains and drop its front edge down to the ground and...voila...it becomes a fairly good imitation of a ramp.


I still haven't got the interior organized with a place to hang everything and everything hanging in its place, but that will come over time. 

The great thing about this addition was the deck extension, which just happens to be a little wider than the length of my outdoor workbench. I installed the alternating 2x4 - 2x6 decking with no spacing between them, hoping that they won't expand and pop somewhere. This means that all my shavings, sawdust and dropped screws stay on top of them, instead of falling through the gaps into the dark hole below.

Peace,

Mitchell

Note: I am just reminding you here that just because I state in these articles that I used a specific material or worked it with a specific tool, it does not mean that I think they are the best choices for the job described. All it means is that, for whatever reasons, what I have stated is the way I decided to do it. Everything I build is an experiment, mainly in aesthetics, but in usability as well. Because I am still learning the art of working with hand tools, in a lot of cases, how I make something is an experiment as well. Because of this, I often miss my old man - big time - because he was the one I bounced all my ideas off of before I cut my first piece of wood. Without him, I have had to learn to rely on the advice of many others, including those that take the time to comment on my posts.


Friday, 12 June 2015

Dear, It Followed Me Home. Can I Keep It?...

Last spring, while out walking the dog, I came across a real find sitting at the side of the road waiting for the garbage truck to haul it away. It was a small workbench made in the 1950's, with a vise attached and all. It was a tad rough, but beggars can't be choosers, so I carried it home. The dog was no damn help at all with this, by the way.

While carrying it home, I took a break at the halfway point and used my phone to take this...


Ok, a Moxon it isn't, but I thought it was just the ticket as my outdoor workbench. I had to stiffen it up a bit, which I did using pressure treated lumber left over from when I built our deck. I was still pretty light, so I screwed it down to the deck's floor. It wasn't perfect, but it was usable.

I also had to rebuild the vise. The screw was fine, but the round wood guides had pretty much worn away. I replaced the guides with 1" hard maple dowels, but not long after I had a devil of a time getting the thing to open. It had rained and the dowels had swelled. I finally got the thing apart and replaced the dowels with copper pipe, which, of course, never swelled. The problem was, the pipe was a hair smaller in diameter than the dowels they replaced, so the vise acted sloppy from that day on. I also moved the vise to the right end of the bench and back again - twice. I couldn't figure out which setup I liked better.

The bench top was a full 20" wide, but only 10" was usable as a worktop. The front half was made from a 2" x 10" hunk of Douglas Fir, but the back half was only 1" x 10" pine, dropped so the area could be used as a tool tray. I hated it, truly hated it.

The other problem I had with it was the top's overhang. There was a full 10" of overhang on both ends, so I couldn't use them. As soon as I started wailing away on anything close to the ends of the top, the material would bounce around like crazy.

So I have started to modify the old girl...


I used 2" x 10" construction grade lumber for the new top, which means it is either Fir, Pine or Spruce. I cut everything to length and then applied Thompson Water Sealer to all the hidden surfaces. With a bead of construction adhesive on the mating surfaces, I screwed down the first layer using 2½" screws. I then gave all their top faces a second coat of Thompson. When that had dried, I laid down a second layer of timber, also using construction adhesive, but this time using 3½" screws. Once things were set, I laid out the holes along the length of the top and face, putting a dog-hole every 6". Because I staggered the joints in the different layers, I couldn't space the rows out evenly, but I did get five rows in the top and three in the front.

With the dog-holes drilled, I went ahead and flattened the top...

I started flattening with a Stanley #5 that has a
cambered blade. Note the gap. When I installed
the top layer of timber, I used clamps to draw
the pieces together so there were no gaps. I let
it sit with the clamps on for 24 hours, then
removed them and let it sit for another 24
hours. When I returned to it to start planing,
a ¼" wide gap had opened up on one end.
Bugger!
I then went at it with a Stanley #8, starting at an
angle of 45°, then from the opposing 45°, then
along its length to get it flat.
I then finished off by going over the whole thing again with
a Stanley #4.
Once I had the top flat, I chamfered all the holes using an 82° countersink bit that I got from Lee Valley. I can't praise this bit enough as it refuses to bounce or produce tear-out. Brilliant for a countersink bit chucked into a hand drill.

Originally, I planed to just use more Thompson Water Sealer on the top, but that would be too easy and wouldn't look as nice. Instead I mixed up a 50/50 mixture of Spar Varathane and thinners, then tossed in a couple of shots of dark walnut stain. I applied four coats of this, letting the wood soak up every drop, then I gave it four more coats of clear Spar Varathane as it came out of the can.

I had a hell of a time trying to coat the insides of each dog-hole, and failed miserably. The first time I tried the bench out I had a hell of a time getting the hold-down to drop into the holes as they were all swollen. I have an idea how I can correct this. I'm going to re-drill each hole, and before I move on to the next one, I'm going to run through a 1" spiral cleaning brush that has been soaking in the wood sealer. I'll give it a couple of coats and that should limit the amount of swelling, or at least I hope so.

My next attack on this bench is to add a serious set of legs to the right end of it using some railway tie timber I salvaged. It should add some serious weight to this bench and once in, I'll be able to use it to hold a leg vise that I plan to cobble together.

Peace,

Mitchell

Saturday, 6 June 2015

Two Chairs Walked Into A Bar...

A few years ago, travelling through one of the better neighbourhoods of Toronto, I came across a couple of teak patio arm chairs sitting on top of a pile of garbage at the side of the road. A short while later, they were sitting in my backyard. I scooped them up for a couple of reasons. First, their design was one I have admired for years, but couldn't rationalize the expense. Back in the early 80's, when I first discovered this style of chair, they ran about $500 a pop. Also, I have an affinity for teak, so I just couldn't see these two chairs end up as landfill.

This is one of the chairs as it was when it arrived home...

This is one of a pair of poor, old Teak
chairs that someone had chucked
to the curb.

Teak has dropped a bit in price over the years, mainly because a lot of the teak on the market today isn't really teak at all. Their are a few species of wood that share some of the same properties as teak, so they have taken over much of the market because true teak, often called "Burmese Teak", is environmentally protected. If the Teak you buy today is truly Teak, you can pretty much count on it originating from a Teak Plantation located in either Indonesia or India. There isn't really anything wrong with plantation grown Teak as far as its properties go as they are about the same as old-growth Teak, but it doesn't have the same grain structure or colour.

My affinity for Teak came about while I was rebuilding my 1968 40' cruiser back in the early 90's. The boat came out of the factory with plywood decks coated with fibreglass, all painted white and I hated them. I wanted something a little more "nautical" looking so I went with Burmese Teak, which sold for $35 a board foot back then. Between the ⅜" thick Teak deck boards, the 1" thick covering boards and the caulking to fill them all in-between, I think the upgrade cost me about $3-grand, but it was worth every penny.

This is a shot from the flying bridge of my Teak decks on the
bow of the boat. The Teak decks were framed with mahogany
boards and toe-rails, as well as mahogany king boards down
the centreline. The shot also shows the custom dual-anchor,
Teak-covered pulpit I added, as well. The boat was
redesigned and rebuilt to head south.
This is the transom of the boat. What you see stained red is
mahogany, and what is light-brown is teak. The Teak swim
platform was original equipment, although I did have
to rebuild it. The Teak covering boards I mentioned
in the article are the narrow strips of deck around
the cockpit. The custom table is mahogany.
The reason Teak is an excellent boat-building and outdoor furniture material is that it is light, strong, durable and rot, fungi and mildew resistant. Those strong plus don't come cheap, however, as Teak has some downsides. Teak's durability comes from the fact that it is loaded with silica, which plays royal hell with any sharp edge that comes near it. Its rot resistance comes from the fact that it is loaded with its own natural oil, which makes it very, very difficult to keep finishes on it for any length of time. 


If you live in the sunny south, you can leave the Teak unfinished and it will turn a beautiful light silver colour and the only touch-up required is regular wash-downs with salt water. Here in Ontario, we have humid summers and damned cold winters, buckets full of acid rain and a lack of salt water for washing, so our unfinished Teak turns a rather unattractive blah-grey. To put some life in your Teak, you can use specially developed coatings, such as Cetol, or use standard Spar Varnish, or, G_d forbid, Teak Oil. At first, I went the Teak Oil route, not knowing any better. It was a huge amount of work for a very short return. To apply Teak Oil properly, you have to brush on multiple coats, sanding each coat into the grain using progressively finer grits of sandpaper with each one. The excess oil and wood dust is also a royal mess to clean up between each coat. It took a week to oil my decks and when they were done, they were bloody gorgeous, but they turned right shabby-looking within a couple of months and I couldn't face doing them again so soon. I then stripped out the oil with solvents and went at them with varnish. After about four months, there was a number of areas that were showing the varnish lifting, especially in the corners and while I could have repaired it, it would take a week to do, as, with Spar Varnish, you can only lay down one coat a day. Finally, I settled on the Cetol, using the matte for the decks and the gloss for the covering boards. I had to redo them every spring and fall, but that involved only a quick sand and re-coating, a one day job. (Just a note here on the gloss finish Cetol. To get good results, you need to lay down a couple of coats of matte, then a few coats of gloss. No matte - no gloss.)

Ok, back to the chairs.

There were two things wrong with these chairs. The first was that the original finish hadn't been touched since they left the factory, and it was totally gone. I didn't like the blah-grey it was wearing so a full sanding was in order. It also had an original design flaw. The design had a metal bar running through all the slats in the back and seat with its ends running in a track routed into each rear leg. This was to allow the chair to fold. The problem was, there was nothing to hold the legs together at the required distance and as a result, the bar wouldn't stay in its routed tracks. When you sat in the chair, it would rather unceremoniously collapse.

In the left photo you can see the track the bar was supposed
to run in. In the right photo you can see that the plan
didn't work - at all.
To start, I drilled out all of the "pins" that helped hold all the parts together and broke the chair down to its 37 pieces. I then scraped what I could with a card scraper and sanded the rest. I didn't want to try and go down to completely fresh faces, but just enough to give a clean display of the wood's grain, but retain some of its patina and bruises.
A card scraper quickly cleaned up the surfaces, although
it did require putting a hook back on it quite regularly.
It was better than sanding, however, as the natural
oil in the wood clogs the paper up even quicker.
Once I had the Teak cleaned up, I then wiped each piece down with acetone to remove any surface oil so the coating would stand a better chance of adhering. I used Spar Varathane for this job, although Spar Varnish would probably do just as well. "Spar" means that the product doesn't dry to the brittle coating that regular varnish or varathane becomes, allowing it to expand and contract with the wood in its outdoor environment. For the first four coats, I used a 50/50 mixture of varathane and thinner. This watery mixture has a better chance of soaking into the grain more, giving the finish coats a "tooth" to hang on to. Because of the heavy presence of thinner, each coat dried quite quickly and didn't require sanding before the next coat was applied, meaning I was able to apply two coats each day. Once a sheen started to show, I knew I needed to start sanding between each coat and thickening up the mixture. The fifth coat was mixed to 75% varathane and 25% thinner and the seventh and eighth coats went on right out of the can.

This shot shows four seat slats with progressively more coats
of the 50/50 mixture applied to them. The top slate has
received one coat, the second one down two,
the third one down has three coats on it and
the bottom one has received four.
Here are "The Boys" (the 14 bottom slats) hanging in a line
drying the second coat of 50/50.
Once all the pieces had eight coats on each, I sanded all the frame parts so they would be ready to receive a final coat once the chair was together and started assembly. I then widened the bar's track in each rear leg. The mortise and tenon joints were epoxied and pinned, using ¼" maple dowel.

This shot shows the pinning of the mortise and tenon joints,
along with the widened bar track.
I assembled the chair and turned my attention to the new plates I wanted to make for the bar. I purchased 2' of 3/16th brass plate which I cut into two plates. A duplicate of the rear legs' original slots was cut into each plate. I then drilled each for screws and countersunk the holes. 

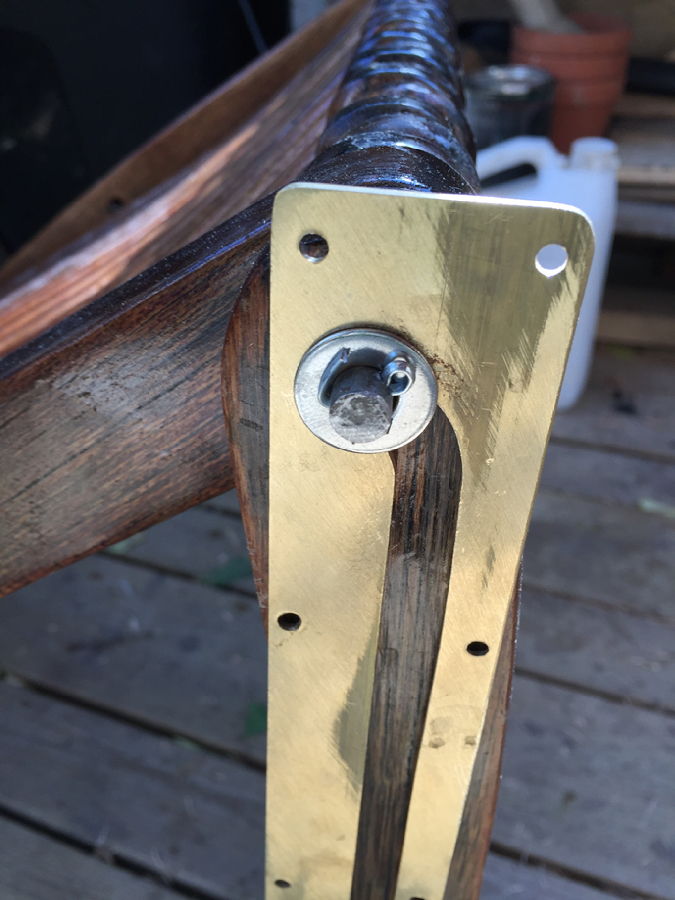
This shot shows one of the new plates I made
and how the bar was held in place to keep the
legs at the required width to fold the chair.
The back and seat slats are interwove, so once I had them together I was able to measure their overall width. I cut the bar to a length that was 1" longer than the slats total width and drilled a small hole in each end to accept a cotter pin. With the bar passed through all the slats, I placed a plate over each end, then a flat washer, then held the whole thing together with a cotter pin at each end. Each plate was then screwed to the appropriate rear leg. This, I figured, would not only support the slats, but would hold the legs together at the required width and the washers and cotter pins would keep the bar ends running in the slots, allowing the chair to fold without the bar popping out. 

I folded up the chair and discovered it didn't work. Damn!

What I had failed to allow for was the amount of wood that was removed from each slat. Surprisingly, over the 27 slats it totalled just over an inch. By cutting the bar as much as I had, the set-up was pulling the legs together at the top, so the chair sat perfectly when opened, but when I tried to close it, the spreaders at the bottom of the legs held the legs apart 1" wider than the bar. Forcing it to close caused one of the washers to fold up around the bar and that end popped out of the track. All of this, however, told me I was on the right track and that the plates would work.

I bought a new bar, but a threaded one, along with a bunch of jam-nuts and washers. Once I had this bar in place, I centred it, then put a washer at each end and a pair of jam-nuts to hold the slats tightly together. The plates were then added, then another washer and two more jam-nuts at each end, these to hold the legs together at the same width as the spreader and to keep the bar in the slot. Folding the chair up this time worked perfectly.

This is the end result, a very nice looking chair that doesn't collapse when you sit in it.


I still have the second chair to do, as well as turn a Teak coffee table I just found into two footstools. I think this work can hold off until next summer. You don't want to rush these things, you know.

Peace,

Mitchell