Thursday 19 May 2011

I Know Jack About This Stuff...

In the last post I tentatively put the thought out there about building hollow workbench legs and filling them with sand for added weight. I dreamed up this brainwave because I want the bench I am going to build to be the perfect boat anchor. Making an 8, 10 or 12-foot bench heavy enough appears to be an easy task if you can afford the right timbers. The one I want to build will only be 5-feet long or less, so I think even if I could build it from ironwood, I’d still be chasing it around the room (ironwood often weighs more than 90-pounds per board foot).

The great part about blogging is how quickly things can happen. It didn’t take longer than two hours after posting that article before I realized I was on to something. Ok, the downside of it all is that my original brainwave turned out to be about as original as green grass, but at least I knew it is going to work.

I got a few comments posted here, plus a few more emails and they all said the same thing; “been there – done that – love it!”

Out of all the responses I got, only one used sand; Stoner told me he built a covered tray under his bench and filled it with four bags of sand. By my calculations, he added a quick 360-pounds to the weight to the bench for, what? fifty bucks?

Damlen in Belgium used gravel to fill his hollow workbench structure. He also suggested a possible negative to using sand, mentioning that it may possibly seep through the joints. It was good of him to mention this as I hadn’t thought too much about it, but will now that he warned me of the possibility.

Others emailed to say they filled their structures with scrap metal, stones, bricks and other sundry material that they recycled into ballast. It all was useful information for me and I thank you for it.

Now that all of you have confirmed to me that I am on the right track, it is time to take the idea and run with it. Ok, maybe not run with it, but at least be able to move it around a bit.

A while ago Chris Schwarz posted about Floor Truck Locks, an odd name for something that jacks a wheeled item up so its casters no longer touch the floor. The ones Chris discussed are available from the CasterStore.com for thirty bucks a pop.


Here’s the rub; with all that weight in each leg, anything that will jack it off the floor needs to be right under each one, preferably centered. Putting these in that position will make it impossible to activate the foot petal. Modifying them will result in a boom, rather than a foot petal, so these wonderful little items just aren’t going to work of me.

Enter my next brainwave.

Now I would like to think this is just pure genius in motion, but the reality is, the idea I have is based on the same concept as the adjuster I designed for the Birds House for the Shooting Board. Even that wasn’t an original concept as it is based on the same technology we all have used for years to change a flat tire – the scissor car jack.

Here’s the idea…

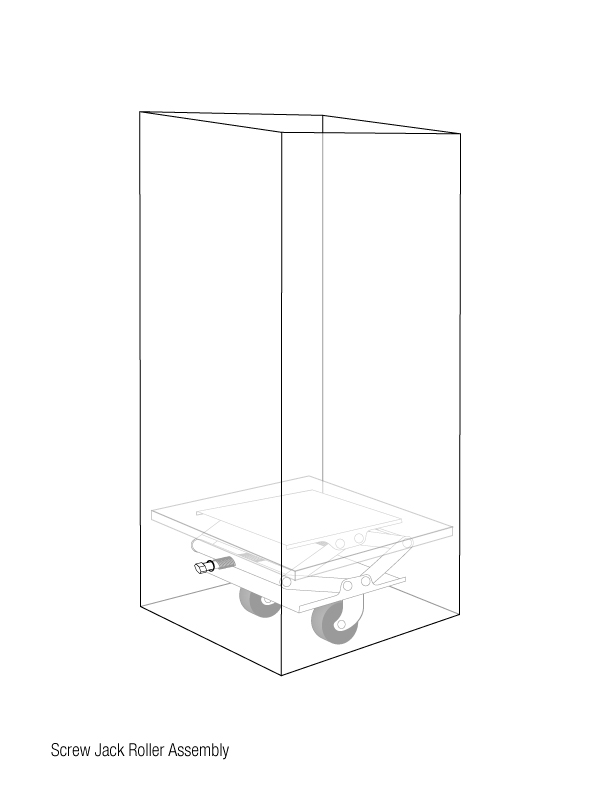
I would rather see the solid wood of the leg resting on the floor than have that leg swinging from a jack so this concept reverses things, putting the caster on the lift and letting the foot of the leg take the weight when it isn’t being moved.

Making a square scissor jack that just fits into the base of the leg will allow the leg’s structure to help keep the caster from twisting in ways I would rather not see it twist.

The casters only need to retract about an inch, so the lift capacity of the scissor jack needn’t be much. This means the raising arms can be shorter than normal, resulting in a more compact lift. As they needn't be monsters, the volume they will eat up inside the leg will be minimal.

Another major point for these things is they can be built out of scrap steel so the cost of each will be marginal.

The biggest drawback to them is that they look like they will be a royal pain in the butt to use, so I won’t want to move the bench too often.

The biggest issue, I think, is tying each pair of jacks together so both raise and lower using only one screw that turns both jacks. I can’t see how they can be raised independently without causing the bench to seriously twist, which would end up tearing the bench apart.

Like everything else I have done, figuring out how to build this thing will probably turn out to be its most enjoyable part of it.

By the way, while looking for some scissor jack ideas on the web this morning, I came upon this site – Jack-Bench.com.

Peace,

Mitchell

Friday 13 May 2011

It's Hard To Get Your Bench To Eat Ice Cream...

My life has been spent trying to reduce the weight of something. When I built cars, I spent a lot of time removing metal to increase the weight to horsepower ratio. Over my entire 30-year career as a photographer, I spent a great deal of time and a huge amount of money searching and buying lighter weight equipment for location work. I have also spent my entire adult life trying to reduce the weight of my butt, but maybe that isn't a good analogy here.

Becoming a hand tool freak has changed a lot of things for me including this thing I have about weight-reduction. Now I am trying to calculate the best way to add weight to something, rather than remove it – specifically, a workbench.

I have been mulling over designs for a workbench for years now. My problem with coming up with one I feel would fit the bill is that I know all the things that I don’t like about a bench, but damned few of what I like. I have worked at a few benches in my time, but only one or two that were "real" benches. The rest were just a bunch of 2 x 4’s cobbled together in a squeeze. While shoddy, wobbly and rather unattractive, those stand-in benches did teach me one thing about a good bench - it doesn't have to have 'weight', it has to have 'serious weight'.

How to add massive weight to a small workbench has been the rub. I have come up with a number of ideas, everything from simply using massive timbers to storing tools beneath. Processing each idea, though, has resulting in points from the “don’t like list” coming into play.

It boils down to this; I want a solid workbench that isn’t a dust collector. I don’t want to chase the damned thing around the workshop and I don’t want one that is a pain in the butt to keep clean, both on top, and underneath.

A possible answer to my quest for an ideal bench, at least in the weight department, may come from an idea that I am currently mulling over. This current brainwave can be summed up with one word – sand.

To say that the working facilities I have been struggling with for the past two years are “limited” would be an understatement. I have been working off of a portable work bench that has a piece of ¾ ply clamped to it to extend the top and two 50 pound bags of sand strapped to a make-shift cross member to add to its weight. It was those two bags of sand that gave me this brainwave.

Whenever I read some woodworker bemoaning the
fact that his or her bench is only 8' or only has
one vice, I laugh, and laugh, and laugh.

Here’s the thing; before I strapped those two bags of sand to it, just trying to drive a screw would start the chase. After the bags were added, the bench became reasonably stationary, even while doing light planning. It all boils down to weight.

Question: So what if you add those sand bags to a normal looking workbench?

Answer: It would look seriously silly.

Question: how can you hide a 50-pound bag of sand in an open workbench?

Answer: in the legs.

This is a render in perspective without any
embellishments. It does show the widths
aren't that out of proportion with the height.
Here's what I have been mulling over…

Concept:
  • As a base calculation, I will use one of the cheaper woods, say Poplar.
  • While a standard bench top is 24-inches deep, I would prefer one a little deeper to help make up for its shorter length, which will be 5-feet. Hence, the depth of the top for me is 28-inches.
Dress this up with a bit of trim and it
might not look too bad.
  • By positioning the rear legs flush with the rear edge of the top and allowing for a 4-inch set-back on the leading edge, I would be left with 24-inches between the outside edges of the legs.
  • It would be possible to build the legs out of 12-inch stock, but I think 10-inch stock would be better.
  • Considering that 10-inch stock isn’t actually 10-inches wide and allowing for joining, you end up with an inside dimension of 8 inches.
Volume Calculations:
  • 8-inches by 8-inches equals 64 square inches.
  • The average height of a bench leg is 28 inches.
  • 64 square inches times 28 inches in height equals 1,792 cubic inches.
  • There are 1,728 cubic inches in a cubic foot.
  • This means that one leg would have an internal volume of just over 1 cubic foot.
Weight Calculations:
  • On average, 1 cubic foot of sand weighs 90-pounds.
  • As one hollow bench leg has a volume of just over 1 cubic foot, filling with sand would then result in that one leg weighing in at about 92-pounds.
  • Four hollow bench legs filled with sand would then weigh about 368-pounds.
Comparison:
  • Maple has an average weight of roughly 3.5-pounds per board foot.
  • To equal the same weight, it would take 26 board feet, or roughly one piece of maple 12-inches by 12-inches by 28-inches.
Cost:
   Poplar:
  • Here in Canada, a running foot of 12-inch poplar from Home Depot runs about $3.50 a foot
  • Each leg takes about 11¼-feet of stock, so at $3.50 a running foot, one leg would run you $40.
  • The wood for a set of four legs would run about $160. 
  • A 50-pound bag of sand costs $12.
  • Four legs require four bags of sand so the cost of the sand would be $48.
  • The total cost for a set of seriously weighted legs? About $210.
    Maple:
  • You couldn't find 12-inch by 12-inch maple, so you would have to do a glue-up.
  • However you got it, a board foot of maple costs $9.50.
  • Each leg takes 26 board feet, so each leg would run you about $247
  • The total cost of a seriously weighted set of legs in maple would run you about $988.
Conclusions:
  • Chris Schwarz estimates his latest Roubo bench weighs about 300-pounds.
  • At 368-pounds, this idea has legs that weigh in at more than that and the weight of the top hasn't even been factored in as yet.
Go figure.

Peace,

Mitchell

Friday 6 May 2011

They Told Me To Get A Grip, So I Got A Comfortable One...

Being a newbie at these hand tools, I always think that it is me that is doing something wrong when I use a new tool and it doesn’t live up to my expectations.

My Veritas 15” Low Angle Jack Plane is a great example. I received it as a gift a few years back and was happier than a pig in poo because it was something I really wanted. The day after I received it I had to plane a number of edges on some 2 x 6’s for a deck I was building. To be honest, I was never more disappointed in something as I was with this plane. It cut beautifully, had very little tear-out, and was a dream to set up. After planning about 160’ of stock, though, my thumb and wrist were as sore as I’ll get out. Having done the same amount of stock the previous weekend with my Stanley  No.6, I had a niggling in the back of my mind that it was the tote, but lack of experience caused me to blame myself, rather than the tool.

The Veritas 15" Low Angle Jack Plane with the replacement tote.

I can’t tell you how happy I was when I read an article Chris Schwarz wrote in his Popular Woodworking blog about a fellow who was creating and selling replacement totes for Veritas’ planes. It was like I had been found innocent of tax evasion when I read the first line; “The only complaint I ever hear about the Veritas bevel-up planes is that the rear tote isn’t as comfortable as that on an old Stanley or new Lie-Nielsen plane.”

After reading the article I hit the link Chris had posted and sent Bill Rittner off an email asking for some pricing and what stock was available. I got the answers, and as I was busy with one thing or another at the time, I put it on my “to get” list.

Cruising eBay a few weeks ago, I ran across a listing for Veritas replacement totes. At first I thought it was some the same person and was a little taken back by the difference in prices. I was looking at a huge spread here. Comparing Chris’ article with the eBay listing, I realized the totes were by different makers. I sent the maker, Mike, an email asking a few questions and got an immediate reply that hit all the right notes.

I immediately ordered the eBay version.

It doesn't take long to see the difference between the
stock Veritas tote (left) and Mike's replacement.


Naturally, price was a major driving force in this decision, but there was more to it than that. 

These line drawings quickly size up the situation between
the two totes. Mike's version (in green) has a far
better angle of attack than the stock version.
Type of wood
The tote I got from Mike was made out of Bubinga, which matches the stock knob that came with my plane (post 2003 model). I really like the knob and didn’t really want to replace it.

Bill makes his knobs and totes out of Cherry and Walnut, sold in sets. While I love these two woods, it boils down to not wanting to discard the Veritas knob. While Bill’s knobs are nice, they are not as near as beefy as the stock model, so I felt what I gained on the tote, I’d loose on the knob. 

Design
The design of the tote was a major point. Mike states his totes are based on the Stanley No.5 tote design while Bill didn’t state what his was based on. When I looked at Mike’s pictures of his tote, I thought it was a Stanley replacement at first. When I looked at Bill’s, while it is far smoother and sexier than any Stanley tote has ever been or ever will be, it is a long way from the familiar design. The thing is, I like Stanley totes. They are comfortable and well balanced, but then given my reaction to the Veritas tote the first time I used it, what the hell do I know.

Mounting
One of the major deciding factors that swung me over to Mike’s tote was the way it mounts. The original Veritas tote has two mounting screws, which Mike stays true to. Bill, on the other hand, favours just using one of them. While the way Veritas mills the tote to accommodate the screws bugs the hell out of me (see the image with caption below), I have always thought the double screw was a great idea. How many old Stanley’s have you seen with the front edge of the tote torn because of that silly little hump in the casting?

Price (of course) 
The ready for finishing bubinga tote I got from Mike was $16 plus shipping.

The quote I got from Bill was $40 for a finished set.

Not only did Mike stay true to Veritas' design of using two mounting
screws, he even set the counter sink for the screws' heads in
the same manner as Veritas. The fact that they are not
flush with the top surface of the tote drives me
mad, mad I tell ya!

While I haven’t held one of Bill’s examples in my hand as yet, I will say that the quality of Mike’s work is quite amazing, even at four times the 16 bucks. The lines are very crisp and the surface is ready for finishing.  

I have a slowly growing pile of tool parts that I plan to French polish and that is exactly what this tote deserves.

If you are interested, you can send Mike an email using this link,
or go to his eBay Store to find his listings.

Peace,

Mitchell