Monday 23 September 2013

The Old Man's Reaction...

I was thinking this morning about how my old man would have reacted to the current rebuilding of my tool cabinet. Here is how I think that conversation would have played out...
Old Man: What the hell do you think you're doing?
Son: Nothing. Why?
Old Man: Because it looks more like you are building furniture, that's why.
Son: Come on, pop. I'm just making a display for my tools that I can enjoy looking at and still be able to use them. 
Old Man: What the hell are you talking about? Tools are only made to be used, not looked at. What the hell do you think they are, artwork? 
Son: Well, pop, they may have been made to work with, but that doesn't mean their designs shouldn't be appreciated. Some of them are really quite beautiful in their own right; like little sculptures. 
Old Man: Awe, bullshit! Do you ever listen to yourself when you talk that artsy-fartsy stuff? If you have to do this kind of pamby-assed thing, just bang a few nails in the back of the cabinet and hang the bloody tools on them. Stop making such a big deal out of nothing, for Christ's sake. 
Son: The cabinet sits in my office, remember, not the basement. I don't want to look at something like that all the time. I want it to look good. 
Old Man: Well if you spent more time working and less time looking, you might actually accomplish something.
Son: I'm retired, pop, remember? 
Old Man: Your too young for that nonsense, but ok, you want to sissify a bunch of tools; I can live with that, but do you have to spend so God-damned much money to do it? Walnut costs a bloody fortune. 
Son: It isn't sissified, pop. I just see things differently than you, thats all. And as far as building it out of walnut, I chose it because I know it was your favourite wood. The whole thing is sort of a tribute to you, if you must know. 
Old Man: Tribute - Schmidute. If you want to build something for me out of an expensive wood like walnut, build me a damned coffee table!
And with that, folks, he would have turned on his heel and stormed away, leaving me standing there shaking my head in wonderment. As he stormed away, though, I know he would have been wearing a grin from ear to bloody ear, the grumpy, old codger.

Peace,

Mitchell

Friday 20 September 2013

Standing Tall...Not Me - The Plane...

It took a bit longer than I expected, but the 10½ now has a mount, or at least one that is as far as I can take it for now.

Here is where the mount stands right now...


There is a cap missing at the left end of the base which has to be added to lock in the sliding dovetail of the heel mount and extend the base to its full length. I can't add that piece until the final glue-up because, for strength, it has to be glued to the finished bracket below it, rather than to the end grain of the base. The right bracket is also unfinished as it still has to be altered to accommodate whatever tool I decide to mount below it. Until that happens, I have to be able to disassemble the entire mount.

While I stated I wanted to keep the mounts for each tool as separate as possible, I just couldn't resist including the left bracket that holds up the 10½ with the upper mount for the No.7 mounted below. This resulted in remaking the No.7's upper mount, but I think it was worth the effort and wasted material, despite the maze appearance. I thought I left enough waste on all the upper mounts, but as it turns out, I didn't.

Yes, I know, if I had drawn up plans beforehand, this problem wouldn't exist, but realize that drawing up plans for a layout like this would probably take as long to do as it would to make the layout. Also, in a case like this; mounting a tool is one thing, but getting it in and out of that mount is quite another. Because of that, it is almost impossible to create a good set of working-plans in a 2-dimensional space and less than fool-proof creating them in 3-dimensions. You just can't take into account all the variables that come into play when it is time to place the tool into its mount and get it out again. I know, I tried as, remember, this is my fourth attempt at fitting-out this cabinet. For me, the challenge of a job like this is far more enjoyable working from a idea that is liquid in my head then it is working from a fixed commitment on paper. If I drew up a plan, each part of the design would have to be followed because all the other parts depend on it being made as it was drawn. If you change one part, you throw all the other pieces out of whack. You also can't think of everything. While I commit to creating the piece following the idea I have for it in my head, once I get into the actually making of it, designs and concepts come to mind that I never considered previously. If I was working from a plan, I would either have to ignore those new designs and concepts, or commit to them and risk throwing all the other pieces in the plan out the window. For me, not only is working with liquid ideas is more enjoyable, I think it makes the most sense in the long run.

Ok, so this mount is like the rest; made from solid walnut stock. Overall, it is, or will be when the toe cap goes on, 11" long and 2½" wide.

The sliding heel mount is made from two pieces; a 2" by 2¼" by 1" block for the top piece and a 1" wide by ³⁄₈" thick by 1½" long piece for its dovetailed slider. These two pieces are joined by glue and two small screws from the underside so replacing them will be possible if one or the other breaks down the line.

The toe mount was also made from two pieces; the top piece having its grain running with the base and the second piece, the spacer, glued under it with its grain running across the base. These three pieces were cut to size individually with the only fitting done to the spacer, shaping one edge so it fit tightly against the toe of the plane. Once all three were to size, they were glued together and then shaped as one.

The dovetail pathway was cut in the base using a fine Disston dovetail saw, then cleaned up with a chisel and smoothed with sandpaper. The dovetail slider was shaped using a plane then, like its pathway mate, had its edges smoothed with paper.

The two brackets that support the mount were made together from one piece of stock 2" by 2" by 8" long. I created a step-down in two of its corners on both sides of the stock using three sizes of Forstner bits. I then rough-shaped these and the stock between them using gouges and chisels, smoothing the results using blocks and sandpaper.

Once I had the different pieces shaped and set together in their final configuration, I then decided which edges and corners would be rounded over and by how much. I used a chisel to rough them in to define their radius, then smoothed them out with sandpaper.

Sandpaper is frowned upon by many, and while it is true that a good plane and scrapper will work rings around sandpaper on larger stock, with these small, fiddly, little pieces I didn't have much choice. Besides, I like working with sandpaper as it allows me more control when it comes to finer details. Maybe this comes from all the work I have done on car bodies over the years, I don't know, but it works for me.

Because discussions of sanding are not covered as much as other tools on the web, I have assembled a few rules for using it below. These rules are based on what I learned decades ago while working as an apprentice auto-body man. My love of cars got me into that apprenticeship, and while I'm thankful for it teaching me that I didn't want to grow up to be a body man, it also taught me what I did want to know, like how to shape material using different tools, including sandpaper.
  • When you start the sanding process, get comfortable, your going to be at it for a while. To sand properly, it takes much more patience than you think. With this job, I have gotten into the habit of hauling the stuff I need, including a drink and snack, out onto our front porch and settling down on one of its steps for the long-haul. The open air disperses the dust and the neighbourhood traffic offers me enough distractions to keep me interested in continuing on until the job at hand is done.
  • Whenever possible, use a block, no matter how uncomfortable using one turns out to be.
  • If you are working a flat surface, use a flat block. The longer the stock, the longer the block. This may mean buying your paper in rolls, rather than sheets, if you are working longer boards. There is a point, however, where even a dedicated sander like myself will turn to a long plane with a sharp blade and a scraper with a good hook over an array of sandpaper in assorted grits. There is no denying that, on longer boards, the former is much better and faster than the latter.
  • When working a rounded surface, make or find something hard that fits the contour you are working on to use as a block. As my wife never reads these posts, I can be honest here and tell you that her stainless steel container that she loves having on our kitchen counter to hold all her fancy cooking utensils has a radius that is an exact match to the curvature of the toe on a Stanley plane. I think you can imagine how I came to know this.
  • Use course grits to waste stock and rough-shape the larger areas of the piece. I never go rougher than 80-grit. The exception to this is when I'm working harder wood, which can force me into using 60-grit to help get the job done in a reasonable amount of time.
  • To get the initial shape true and flat, whether a contour or a flat, wrap an appropriate block with the sandpaper and work in a 45° angle to the grain, first in one direction, then at 90° to that first angle. Working in cross-grain directions will cut away the high spots and not allow the different types of veins in the wood to affect the block's travel. Once you have the area flat or evenly contoured, sand it again, still using the block, in the same direction as the grain to remove the scratches.
  • Change your approach to the piece every so often to "see" the surface. This sounds weird, but when you sand, the pressure you exert on the paper is stronger on the forward stroke than it is on the return. Changing the approach, or the direction you are working from, results in a change in the direction of the paper's cut, raising the grain in an opposing direction. When you look at the wood under properly angled light not long after you started working from the new direction, you can quickly see areas that are slightly different in colour. Usually, the darker areas are the high spots and the lighter areas are the low ones, giving you a guide to tell you how you are progressing.
  • To keep edges square, never allow more than a quarter of the block's length to pass beyond the end of the surface. If that requires shortening your strokes considerably, then so be it.
  • Change your grit according to the area you are shaping. The finer the detail - the finer the grit.
  • Once shaped and you begin to work a finished surface, always, always, always work the paper in the same direction as the grain, no matter what grit you are working with and no matter how uncomfortable or short your strokes have to be.
  • Don't leapfrog over grits to finish the piece quicker. It doesn't work. The pieces I have made so far are NOT ready for finishing with varnish. They are only shaped. When I am ready to finish them, I will return to the 80-grit wrapped blocks to ensure the larger surfaces are true, then go to 120, then 180 and finish with 220. I will then wipe each piece with a damp towel. One purpose for this is to raise the grain, which I take down with 220-grit. The other important reason to do this step is so you can "see" scratches and flaws. Any scratches and flaws that show on a damp piece will also show even worse on a varnished piece. 
  • To explain how a finished surface works; when light hits a surface with imperfections, it bounces off at different angles, which you see as a dull finish. When light bounces off a truer surface, the rays are reflected in a more uniformed direction and you see it as being shiny. Varnishes even out the surface and make it truer, causing the light to reflect uniformly. Special "flattening" additives are added, the amount dependant upon whether or not you want a flat, sheen, semi-gloss or high gloss finish. A flat varnish has a great deal of these additives while a gloss varnish hasn't any at all. They all produce a truer surface, but those with the flattening additives cause the light to bounce in a non-uniform manner, not only off the surface imperfections, but off the varnish's additives as well, masking the surface imperfections in the process. With gloss varnish, the truer surface reflects the light uniformly while the surface imperfections don't, making them stand out like a sore thumb.
  • If a piece is going to be stained and/or varnish, I wouldn't go finer than 220-grit. If a surface is any smoother than that, the adhesion ability of the varnish will be compromised. The Varnish needs a "tooth" to hold onto, seeping into their nooks and crevices. Make the surface to stick and the thick varnish won't have anything to seep into. Wax raw wood, however, is a different story. When waxing, the smoother the surface the better. If a piece I am working on is to be only waxed, I will continue on from the 220-grit with 280, then 320, doing the final sanding with 400-grit. It doesn't stop there, though, as I then apply multiple coats of wax using a progression of ever-finer steel wool, the steel wool taking over where the sandpaper left off. When working very hard woods, I'll follow the same process but instead of stopping the sanding at 400-grit, I'll do one more with 600-grit, then apply the wax as explained before. The steel wool isn't as effective on hard woods as it is on soft, so I find that extra grit helpful in ensuring a good finish.
As for the cabinet, here is an over-all shot of its slow progression.


I'll see you again in a few days to show you what I end up mounting beneath it.

Peace,

Mitchell

Friday 13 September 2013

Tool Cabinet v4.0 Update...

So this is where I was at when I called it quits today...


It wasn't actually the most productive day I have had in a while. Throughout the afternoon I kept making one mistake after another. While checking the calendar to answer a question for my wife I realized that it was Friday the 13th. Not wanting to continue to tempt the fates, I packed it in, took a couple of pictures and called it a day.

All I got for about 4-hours of work was a mounted Veritas Low-Angle Jack Plane with uncentred mounts...damn, and this...


The mount for the Stanley 71 with all its accompaniments will give you an idea of where I'm headed with this. I'm trying to produce something that flows together, which is why the accessory display is moulded to the mounts and the bottom mount for the 71 is also the top mount for the No.8. While I'll do the moulding trick to all the tools that have accessories, I won't do the combined mounts that often. I think that if it is done once too often, it will start to resemble a crazy maze.

I kept the sides of the 71's mounts square as I don't have a clue yet which plane I'm going to mount beside it. I know the 271 has to fit in here somewhere, but I'm just not sure where yet. By keeping the ends square and keeping the horizontal-grained bottom layer shorter than the top, it will be an easy process to tie into them to continue on. If I don't want a continuation of the mounts, I can just reshape what's there to whatever I find pleasing.

And speaking of shapes, as you can see, there are no fancy edges or carving on any of these, even though 80% of the work on each has been done with chisels. I thought the hard look of the tools would be accentuated and would add more to the display if they were placed up against soft curves, so the only shaping I'm doing on the mounts is giving all their edges a soft round-over. So far, it isn't really working for me, but I think once the walnut has a few coats of satin varnish on it, darkening it, the shape contrast might pop a little more and the tonal contrast will be less, at least I hope so.

Next up is the No.10½. I have been looking forward to getting at this one for a week or so, ever since I came up with a design for a horizontal locking mount for it. It should be an interesting build and a hell of a buzz if it works.

I'll catch you up on how I make out with it in a few days.

For my Jewish readers on this, the start of Yom Kippur, I wish you an easy fast.

Peace,

Mitchell

Wednesday 11 September 2013

Tool Cabinet v4.0


I have finally quit mucking about and jumped into "Tool Cabinet v4.0" with both feet. This is where I was at last week, with more planes already added and other mounts on the bench that are close to completion.


As you can see, I've stripped everything out of two of the three display areas and have started putting it all back together yet again. Having spent two years analyzing my last three attempts at this, not to mention having analyzed photos of God knows how many other woodworkers' tool cabinets, I have a fair idea of what I want now and an almost equally fair idea regarding how to get it.

My thing with tools is that I get a kick out of their design. Some I think are brilliant, and some not so much, but either way, I like to look at them just as much as I like using them. This, as it turns out, is the main criteria for what I am looking for when it comes to a tool storage cabinet that I can be happy with. I also had to figure out if getting what I wanted meant starting again from scratch, or simply modifying what I have to make it work.

To give you a better idea of where I am coming from, let me give you some of my thoughts regarding a  cabinet and a chest that are currently all the rage.

Christopher Schwarz, thankfully, has brought the old tool chest back to its rightful place. Each of the many that he has made over the past few years are ready, willing and able to haul his tools wherever his livelihood takes him, or just keeping them all together in one spot in his shop. I'm not knocking him for pursuing a chest over a cabinet as I am sure he chose what works best for him. The thing is, while this style of tool storage works well for him and many others, it would be a disaster for me. This is because I neither travel with my tools, nor have a workshop, but more importantly, I collected my tools not only to use, but also for the pure joy of having them around. Hiding them away in a chest, in or out of a shop, would wipe out half of the enjoyment I bought them for in the first place. I think a chest is a fine answer to a specific purpose, but neither the chest, nor its purpose are a good fit for me.

The next most popular style I think has to be emulating Henry O. Studley's wall-hung tool cabinet. Lets face it, that is one beautiful piece of workmanship, but after looking at all the photos and videos of it, plus reading everything there is out there describing it, I came to the conclusion that it too wasn't for me. I also realized that my biggest mistake with my previous three attempts at making my cabinet work was that I too tried to emulate ol' Henry's work. The hardest part of getting to this conclusion was getting past the bling. Once I accomplished that, I was able to take a good look at his cabinet for what it is, a storage container for his tools. The bottom line is, ol' Henry built this cabinet so he could store his tools under lock and key when he went home at night. He did it in a blaze of glory, but once I got my head around this fact, it was easy to understand why his style of cabinet didn't work for me. The reason I came to this conclusion is simple; I can see there are three layers of tools in his cabinet, but damned if I know what any of them are below the top layer, and therein lies the rub.

There are a number of others that I looked at, but these two stand out as the best examples of what I don't want. The best example of tool storage that I do want is the wall-mounted set-up done by Steve Branam, over on the Close Grain blog. His tools are laid out in the best organized plan I have ever seen. He has full sight of each tool and accessing them is simply a matter of snatching and grabbing whichever one he wants. While the style of his set-up is something I would like to emulate, the problem I have with it is that I don't want to use an entire wall to do it. 

After analyzing everything in sight I was finally able to put together a short set of simple guidelines that outlined what I wanted.
  • I need a cabinet to hold all my tools
  • I want to be able to see each tool in its entirety.
  • I want each tool displayed at its best
  • I want to be able to access each tool quickly and easily

This, at first, caused me some problems as I realize that while my existing cabinet is large enough to hold all the tools I own, they all can't be displayed. That, to me, was a real shame, but then I realized what I said in the third paragraph of this post; I think the design of some of my tools are brilliant and some, not so much. Deciding which tools to house in the open display and which to display in the drawers was the key to creating a cabinet that I can be happy with. I also realized that displaying the tools hidden away was as easy as leaving the drawers open, so even the problems I came up with weren't as serious as I once thought they were.

Once I got a grip on what I wanted, I had to decide whether or not to start from scratch, or give what I had another go. The cabinet I have is made from ¾" marine-grade mahogany plywood. Marine-grade plywood doesn't have any voids between its layers so there is no place for moisture to collect. Add mahogany's ability to resist rot and you end up with material that should, under normal conditions, last a lifetime and more. The design is based on Henry Studley's and Norm Abram's wall hanging cabinets, but with my own twist. The main cabinet is 36" wide with a 36" by 36" by 5½" deep open display area on top and a 30" high by 24" deep drawer cabinet underneath. The open display area has two hinged display areas as well, each being 36" high by 18" wide by 4" deep. The thing is mounted on four heavy-duty casters and is made to roll through a standard door. Because the dimensions of this cabinet are as large as I can go, I realized that I was in for another remake.

When I built the cabinet I had yet to make the switch from power tools to muscle tools, so the number of hand tools I owned was limited. The image below shows the cabinet in its original configuration.


Once I was infected by the vintage tool bug, I started vigorously adding to my collection, forcing the original layout to become obsolete as it just didn't allow enough room for the newer additions. I then rebuilt the inside of the display areas to hold what I had, but sadly, I didn't take any photos of it.

That second rebuild lasted about two years before I ran out of room. I then rebuilt it for the third time, the image below showing the results of that third build.


It wasn't long before I had gone beyond the third rebuild's capabilities and since then I have had tools stored hither and yon throughout my office, most of which I can't see at a glance. I also realized that another serious problem had arisen because of my tool storage problem. Because it became such a hassle, loaded with frustration, finding and rounding up the tools I required for a project, I simply stopped taking on projects. Because I couldn't look at the tools easily, nor was I using them, I started to consider selling them, and that is when I realized I had better get my act together.

So the key to all of this is figuring out which tools to store in the open display areas and which to put into the drawers. My first choice was simple; my planes. I then had to figure out the best way to display each, so again, I started with the easiest choice, the bench planes.

The beauty of bench planes is their simplicity in design, but where they really shine is when they are displayed together. Each is a smaller version of the larger, and when they are lined up to accentuate their differences, I think they are a joy to behold. The result of this is seen in the photo below. I have added the rest of the set since taking this photo, but I think what I have here gives you the basic idea.


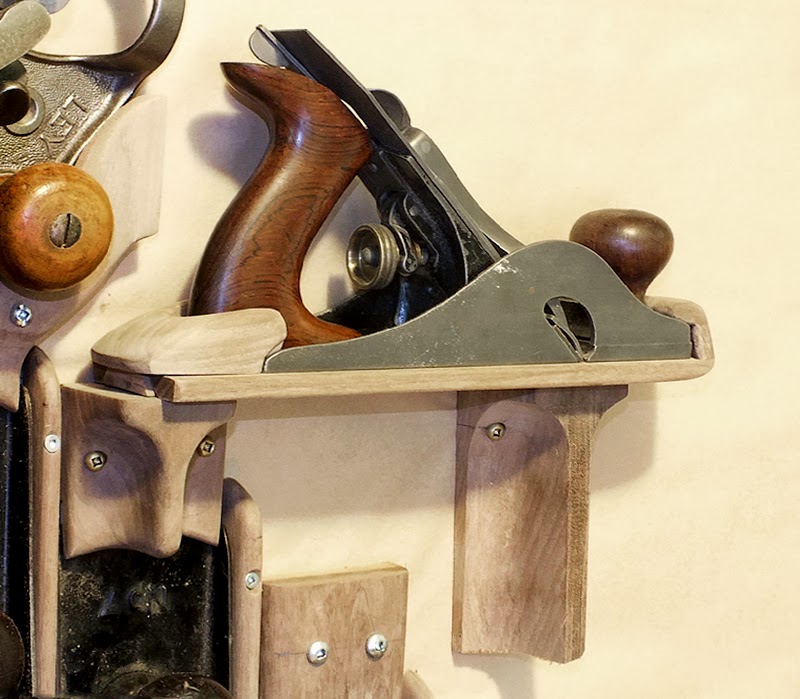
The mounts shown in the photos are not completed yet, but they are close. Each is made up of  two ³⁄₈" pieces of walnut glued together with opposing grains for strength. As you all have probably seen this type of mount a thousand times before, I'll just add a line drawing of their dimensions so you know how they work. I will mention here that the bottom layer is planed to the thickness required, depending on the plane it is made to hold while the top layer remains its full ³⁄₈". The bottom mounts are sized to allow 2" of space between the bottom of the plane and the top of the drawer cabinet, allowing room to swing the planes into place. There are ³⁄₈" wide by 1" deep walnut strips running down both sides of each plane that are to act as registers, minimizing the effort needed to thread the planes back into their mounts while reducing the chance of damage to their neighbours during the process.


These are the simple mounts, but they will become more complex as I work through the group. I am currently working on the mounts for my Stanley No. 71. These mounts are a tad more complicated on their own, but made even more-so because the bottom mount for the 71 is also the top mount for the Stanley No. 8, which is mounted below it. That will be an important part of the design; having one plane mount flow into another, giving an organic feel to the layout.

All the mounts will be made from solid stock black walnut, a tip of the hat to my old man who loved this species of wood. Because the backs of the display areas are so full of holes from the previous configurations, I'll create the layout for each display area, then remove everything and re-skin the inside of each area completely with black walnut veneer. Before I started adding mounts I taped kraft paper to the back panel so I can draw an outline of each mount. I will use this as a guide to make it easier to put the mounts back in their proper positions once the veneer is in place.

So that is about it for now. I am trying to work a little bit each day on this so I should have more to show within the week.

Peace,

Mitchell