A few years ago I put together a front walk using 4" x 8" paving bricks. The following year, I added a planter bed in a corner of it that was begging for some life. Not surprising, the year after that, the paving bricks fell into the bed. Go figure.
What was needed was a solid retainer to hold back the bricks, which, of course, meant pulling up all the previously laid brick. Again, go figure.
This was a relatively small plant bed, being only 2' wide and 5' long. The problem I faced was; how could I make a 4" x 4" frame that size, that the forces of nature, or paving bricks, couldn't shift over time. The answer was to put a frame together using mechanical joints; i.e.: Dovetails.
Now I have trouble creating tight dovetails in ¾" stock, let alone 3½" stuff, but in for a penny, in for a pound, off I went to make a dovetailed plant border. As I started laying out the tails, every video I ever watched on how to cut dovetails started to replay in my mind. Of course, the most prominent were the ones the dovetail pros posted a few years ago showing how to cut dovetails in a few, short minutes. Somehow I didn't think they were going to help me much with this job.
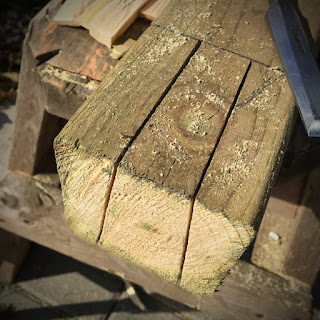
I did the layout, then, using a 14" tenon saw, I cut the tails. With the four tails done, I used them to mark the pins and, again, used the tenon saw, I cut their shoulders...
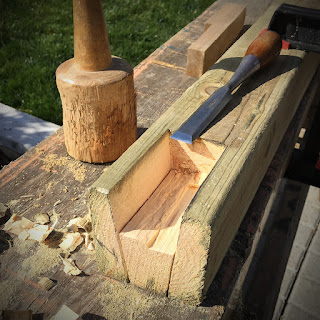
Once down an inch or so, I flipped the timber and started removing wood from the opposite side, chopping away the waste...
The end result was a frame that will be more difficult to shift once it is filled with soil and has the grass pressing up against its outer surface...
In reality, it isn't like I haven't had considerable practise making dovetails lately...
I have thirteen of these suckers made so far, with the stock for the remaining eight sized to length, width and thickness, with just the joinery remaining.
They are all made from solid ½" oak, each corner dovetailed with the ½" oak bottom sliding home in a ¼" dado (North America), housing (UK) or trench (Europe), that was cut ¼" from the bottom on all four sides. I used solid oak, mainly because I had so much of it, but also because I thought it may be advantageous when it comes time to add mounts, supports or dividers to each drawer to hold the tools in place. I can remove the sliding bottoms at any time in the future to modify the drawers' interiors, and if I have to cut into the bottom or sides for any reason when I do these mods, the solid wood will be better to work with than plywood. That's my story anyway, and I'm stickin' to it.
On another note...
The top portion of this bench/cabinet will have two 20" wide hinged tool tills attached to a 40" base till. The sides of each will be maple while the faces will be walnut, assembled in the typical campaign furniture style; the sides, top and bottom dovetailed together as a frame and the face pieces will float in a dado cut around the outside edges of the frame. The end result will be similar (but not the same) to the illustration below (one of 37 designs I came up with)...
So what advice do I need? It is in regards to the two walnut panels that enclose the face of the two hinged tills, as well as the back of the stationary one. The question is, do I make them out of solid stock or veneer a more stable material? The questions I have are...
How much expansion do you think there will be with a 40" wide glue-up of solid walnut?
Would you build it from solid stock or veneer a substrate?
What would you use for a substrate if you went the veneer route?
Any advice you guys can give me will be greatly appreciated.
Peace,
Mitchell


