I just finished another plane mount for the cabinet and I am pretty pleased with the results. Once I got it done I started to think about why I enjoy making things like this without drawing up plans for it first. In the end, I came to what I think is a pretty humorous conclusion.
As a kid, I was obsessed with doodling in the margins of every piece of paper put in front of me. My little doodles ranged from simple line drawings of patterns, to complex full-out sketches. While I could say that my mainstay was doodling cars, in truth, anything that popped into my imagination ended up somewhere in the margins of whatever paper showed up in front of me. I remember sitting through a biz class at university, years ago, where the prof was giving a lecture using an oil refinery as a business model. While he was droning on about production factors, arbitrages and variables, I was busy doodling a couple of 40-gallon oil drums mounted in a rack which I drew as being stored up against the wall of an old gas station. I wish I still had that sketch as it was pretty elaborate, with empty oil cans and rusted bits of car parts stacked all around the oil drums. It was probably one of the most enjoyable two-hour lectures that I ever sat through with that prof and probably also answers the question of why I ended up in the graphic arts business as well, but that is another topic.
Anyway, taking this trip down memory lane made me realize that my penchant for doing little woodworking projects without the benefit of plans is just an extension of the doodling I did before my computers made notepaper obsolete As a kid I doodled on paper. As an old fart, I'm now doodling on wood.
Here is my latest doodle...
I know we are not talking about the second coming of a Chippendale piece here, but just an overdone plane mount in a wild and whacky tool cabinet. This time, though, I remembered to shoot some photos of the route I took to get to this mount, or rather, most of the route I took getting there. As most of you who will bother to read on will note, doodling with wood is like taking a car trip without a map; you might end up taking the long way around, but you eventually get there.
As this mount started life as a doodle, I had no real concept of what I was looking to produce when I started. All I knew was that I needed stock, so I started out with a hunk of 1" by 5½" by about 11" long piece of walnut, whacked it in half and glued the pieces together to make a fair sized chunk of wood. I already had the base which I had put together some time ago. It was about 12" long and made from two pieces that were glued at 90° on their outside edges, which, because their faces had been planed at a roughly 6° angle, would lean the plane towards the back of the cabinet to hold it in place.
I decided that whatever this hunk of wood would become, it would be attached to the base with dovetails, so working from the inside angle of the base, I marked out a set at each end and cut them before cutting the stock in half to make the two braces required. Leaving it whole gave me more stock for easier clamping.
Before you get to the image, I should explain that I have lost a bit more of my eyesight over the past couple of years, so I have started gluing paper to the darker woods I work with so I can see my markings easier. When I started doing this I just glued blank paper to the wood and made my marks with a pencil, but after a while, I realized that was dumb, so I changed that to reproducing the piece to size in the computer and doing the layout marks required on it. I then print off the results and glue the printout to the wood, giving me strong markings that I can see and accurate markings that I can follow. After I'm done cutting the piece up, I just scrap off the paper and glue. It means extra work and time, but hey, ya gotta' do what ya gotta' do...

I started out making these pieces only as supports, but once I had the dovetails cut, I decided to go up with them instead of down, making them into combined supports and holders for the plane. That meant that I had to waste a lot of material towards the centre, conforming the outer edges of these cutouts with the toe and heel of the plane.
I started out using the plane the mount was to hold, the 10½, planing a trough that ran roughly in the middle that removed just less than half the thickness of the stock...
I then shaped the bottom of the trough with a rounding plane...
Then I cleaned it up with a smaller rounding plane, gouges, chisels and a sanding block that I had shaped to match the curvature of the plane's toe...
It was at this point where I lost track of taking photos, but this is when I cut the piece in half. I knew I couldn't have just slots in these side pieces as that would result in having to drop the plane down into the mount, which would waste a lot of room in the cabinet, so I decided to expand the opening in their top edges, tapering it down to meet the cutout I had made in their bottoms, hoping that these expanded entrances would allow me to tilt the plane into the mount, but I still wasn't sure if it would work or not.
The 10½'s tote projects beyond the heel of the plane so I matched its radius with a Forstner bit and drilled out a profile to match it in one of the pieces. I then expanded the top edge in the same manner as I did the toe.
I had dovetails on the bottom of each side-piece to attach them to the bottom of the base, but I needed to figure out the best way to attach them to the base's back, and for that, I needed long-grain to long-grain contacts. As the side pieces had the grain running vertical while the base's grain ran horizontally, the only way I could think of doing this was to cut a lap joint in each, even though the base was already assembled (the first time not having a plan caused me grief on this particular doodle). Cutting the lap was easy on the sides, but a bit of a bitch on the base, as the only way I could figure to cut true edges on it was to use a box-cutter against a square and removing the excess with a chisel. I did get er' done though.
With the sides fitted, although still not in their final shape, I started the glue-up, which is when I ran into serious trouble. With the three pieces ready to assemble, each with a coat of glue on their mating parts, I suddenly realized I had to pee, and I mean really pee (see previous post). Never being shy of adapting, I can tell you that this particular plane mount is the only one so far that was assembled in the washroom. Let me tell you, I was really, really thankful I wasn't making a Georgian chest of drawers at the time.
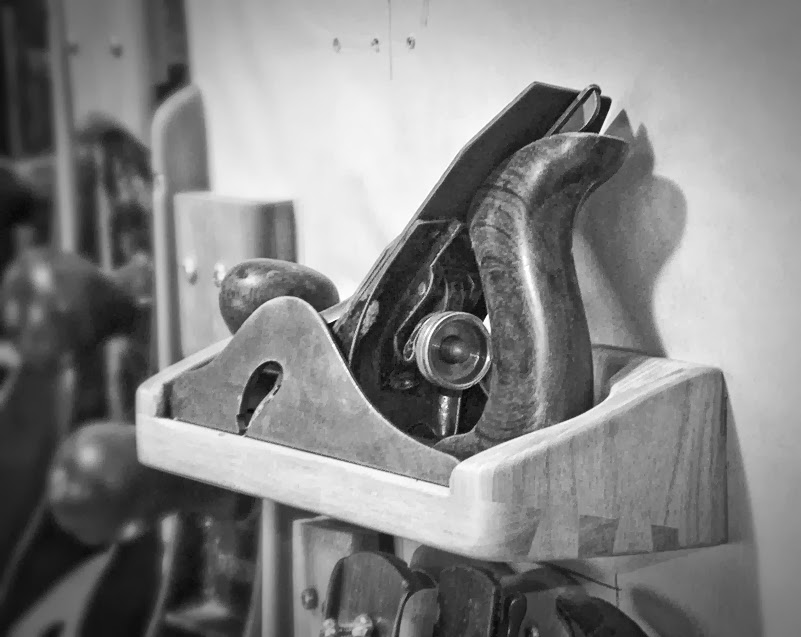
Back in my office, I clamped the thing up and let it sit overnight. The next morning I started hacking away at one end of it without any real concept of where I wanted to end up. Playing around, I finally got the one end done to my liking and worked the other end so it matched. The result is one doodle that I really like...
The dovetails didn't turn out too shabby, either...
And here is where the plane section of the tool cabinet stands today...
I now have to figure out what I am going to use for fasteners for these mounts. Right now I have been using any screw that works, but once the section is finished, I'm going to want to use a fastener that will not only do the job, but look good in the process. I don't want to bury them beneath plugs as I want to keep the cabinet adaptable to additions and revisions, which means keeping the heads exposed. I'd also like something that looks very mechanical, but haven't come across anything yet. If you have any suggestions, as usual, I'm all ears.
Peace,
Mitchell